
- Introduction
- Getting started with TDS Classic
- TDS Classic Architecture
-
Using TDS Classic for Sitecore Development
- The Sitecore databases
- Working outside the web root
- Solution Structure
- TDS Classic project property pages
- Deployment Properties
- Visual Studio Property Window
- TDS Classic Options Window
- Deployment Property Manager
- Adding Sitecore items to a project
- Updating Sitecore Items in a project
- Quick Push Items
- Sync Sitecore Roles
- TDS Solution Features
- Sitecore Item Merge
- Global Config
- Sitecore Rocks
- Upgrading to Yaml
- TDS Classic Builds and Deployment
- Code Generation
- Web Deploy files
- Containers
Sitecore TDS
TDS and Containers
Sitecore TDS has been able to work with containers since containers were introduced. As of version 6.0.0.14, Sitecore TDS has been made more aware of how the community containers are configured. The containers Sitecore TDS was tested agains were configure by the Sitecore Community and are located in the GIT repo https://github.com/Sitecore/docker-images. This documentation describes how Sitecore TDS works with the community containers. As of this writing, Sitecore has not released their official container configurations.
Setting up the community containers for TDS Development
Setting up the community containers is as simple as following the directions on the home page of the GIT repo. This documentation will not address how to do this in detail since the provided documentation already does a job describing the process. The only pieces covered here will be the updates needed to get Sitecore TDS working.
Quick overview of deploying code in the containers
The community containers provide a robust mechanism for deploying code into the Sitecore instance in the container. This is handled by a powershell script specified in the docker-compose .yml file. Here is an example of the CM configuration from the Sitecore XM compose file:
cm:
  image: ${REGISTRY}sitecore-xm-cm:${SITECORE_VERSION}-windowsservercore-${WINDOWSSERVERCORE_VERSION}
  entrypoint: powershell.exe -Command "& C:\\tools\\entrypoints\\iis\\Development.ps1"
  ports:
    - "44001:80"
  environment:
    SITECORE_LICENSE: ${SITECORE_LICENSE}
    ...
The part of this configuration we are interested in here is the entrypoint: setting. This specifies a powershell script that assists in handling deployments to the container.
The script starts a background job that watches a folder called c:\src in the container. The background job copies any files in that folder to the webroot using Robocopy.
Docker has the ability to map a folder on the host machine into a folder in the container. These are called volumes, and can be mounted a number of different ways. This makes it very easy for developers to move files from their local development environment into a container.
The developer copies their files to a local folder, docker moves the files into the container. The background job running in the container copies the files into the web root.
The easiest way to configure this in the community Sitecore containers is to copy the .yml compose file and add a volume declaration to it. This will cause docker to move all files placed in a local folder into the c:/src folder in the container. Then the background job will automatically copy them into the Sitecore root.
Configuring a docker volume for TDS deployments
The first step for setting up Sitecore TDS deployments is to determine the folder on the local file system that will be the source for the docker volume. In our example, we will call it c:\container\cm. This is just an arbitary name and you should choose a structure for your folder(s) that support your development needs.
Next, the .yml compose file needs to be updated. Make a copy of the docker configuration file you are interested in using for development and edit the appropriate configuration to setup the volume you configured for deployment. This is an example of setting up the volume in the CM configuration shown above:
cm:
  image: ${REGISTRY}sitecore-xm-cm:${SITECORE_VERSION}-windowsservercore-${WINDOWSSERVERCORE_VERSION}
  entrypoint: powershell.exe -Command "& C:\\tools\\entrypoints\\iis\\Development.ps1"
  volumes:
    - c:\container\cm:c:\src
  ports:
    - "44001:80"
  environment:
    SITECORE_LICENSE: ${SITECORE_LICENSE}
The volumes: declaration declares that our local source folder is mapped to the c:\src folder in the container.
Start the container using the docker-compose –file [my compose file .yml] up command.
Configuring TDS to use the container
Once the container has started and you can log into Sitecore, you are ready to configure Sitecore TDS to use the container. To create and configure your Sitecore TDS projects, please see the getting stated guides in Chapter 2 to create Sitecore TDS projects.
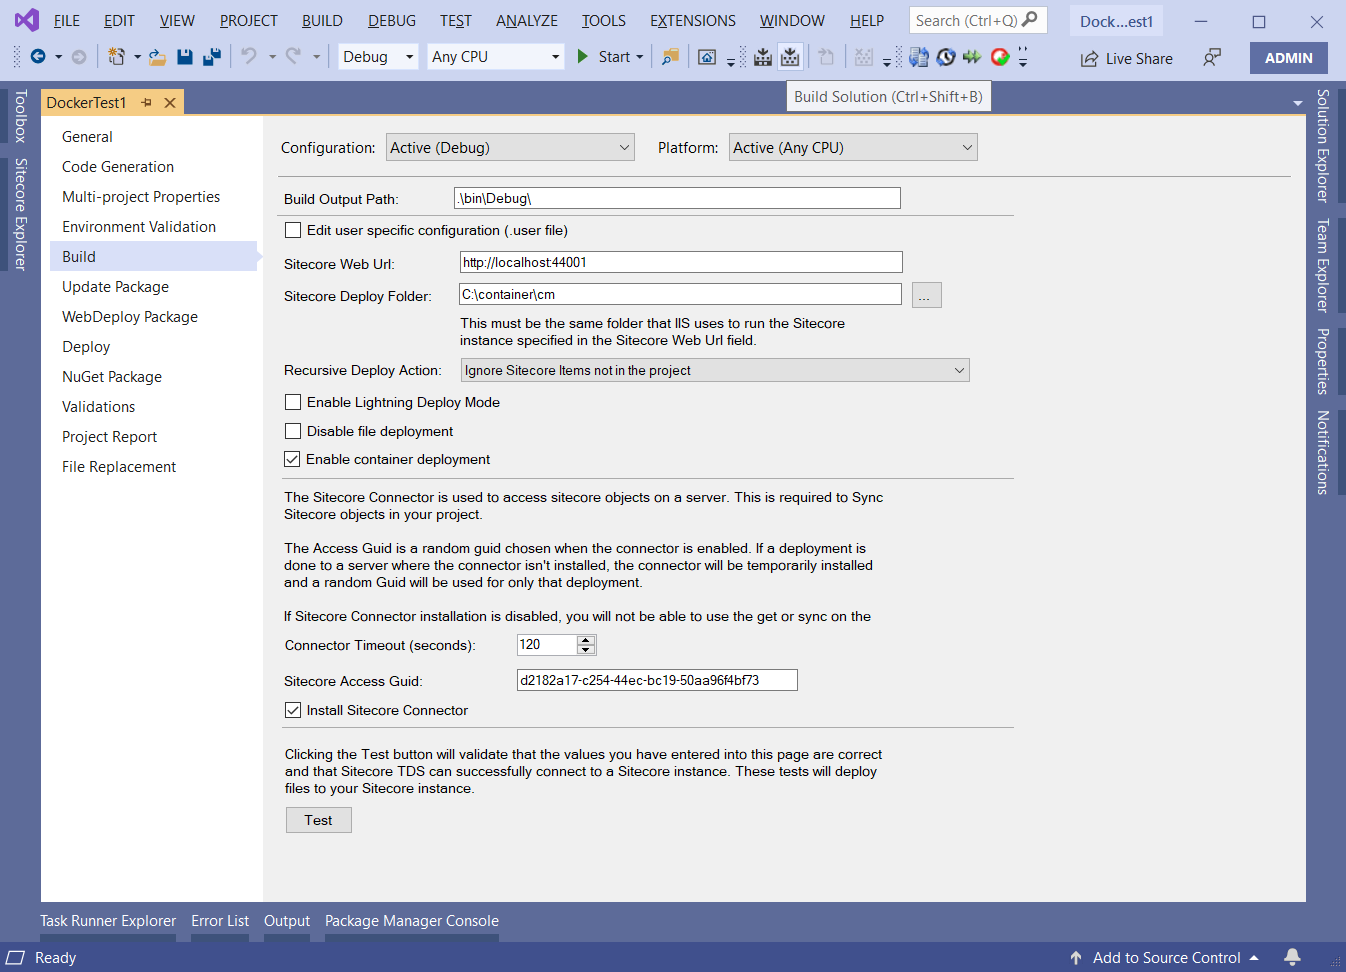
Once the Sitecore TDS projects have been created, open the build properties and specify the following settings:
- Source Web Url: http://localhost:44001
Note: If you have located your CM on a different port, then specify that port instead. - Sitecore Deploy Folder: C:\container\cm
Note: If you have chosen a different location on the local files system for the source of the volume, use that instead. - Enable container deloyment: Checked
- Install Sitecore Connector: Checked
Your build properties should look like:
Next, click the “Test” button and TDS should install the connector and test it in the container:

This may take a few seconds because installing the connector causes the an App Pool recycle.
Conclusion
If all tests pass, you can use Sitecore TDS as you normally would. It will function exactly as if the Sitecore instance was installed locally.