
- Introduction
- Getting started with TDS Classic
- TDS Classic Architecture
-
Using TDS Classic for Sitecore Development
- The Sitecore databases
- Working outside the web root
- Solution Structure
- TDS Classic project property pages
- Deployment Properties
- Visual Studio Property Window
- TDS Classic Options Window
- Deployment Property Manager
- Adding Sitecore items to a project
- Updating Sitecore Items in a project
- Quick Push Items
- Sync Sitecore Roles
- TDS Solution Features
- Sitecore Item Merge
- Global Config
- Sitecore Rocks
- Upgrading to Yaml
- TDS Classic Builds and Deployment
- Code Generation
- Web Deploy files
- Containers
Sitecore TDS
Using Sitecore TDS for Sitecore Development
Hedgehog Development originally developed Sitecore TDS as an internal project to help our own development teams build Sitecore implementations. Sitecore TDS was developed for Sitecore developers, by Sitecore developers. The guidelines documented in this manual are the best practices we have built around using Sitecore TDS as a development platform for many Sitecore implementations. We recognize that not all development projects are organized the same way, and Sitecore TDS was designed to allow as many different ways of developing Sitecore sites as possible.
The primary goal of Sitecore TDS was to allow developers to manage their Sitecore schema (Templates, Layouts, Sublayouts, Taxonomy and meta-data items) the same way they manage source code. The Software development field has, over the years, built many exceptional tools and practices for managing and deploying source code, but Sitecore developers were not able to leverage things like Source Control, automated builds and automated deployments for their Sitecore items.
The Sitecore database(s)
When developing a website, it makes sense for developers to build the implementation on a local IIS instance and commit the result to source control. Since Sitecore is a platform built on IIS, the practice of developing on a local IIS instance is a given.
Before Sitecore TDS was developed, Sitecores’ recommended development environment was a local IIS and a shared database. This worked reasonably well, but there was always a chance that developers would introduce conflicting changes to the database, and resolving these conflicts could cause delays in the development process.
One of the reasons Hedgehog Development created Sitecore TDS was to easily allow developers to build a Sitecore implementation in an isolated development environment. This would mean each developer would have their own instance of the Sitecore databases on their local machine and could work without fear of causing problems for other developers on the team. Sitecore TDS allows developers to bring their changes into a Visual Studio project and, much like source code, the changes made to Sitecore can be committed to source control.
Working outside the web root
One of the practices we use at Hedgehog Development is to locate all source files and projects outside of the Sitecore web root. Sitecore TDS has a built in process that allows the compiled solution to be copied to the target Sitecore website at build time. This allows the developer to easily keep track of items in their project. This arrangement is also advantageous when using file system based source control systems like GIT. There is no longer a need to exclude Sitecore components from Source Control, since the source control system does not see them in the file system. This arrangement also closely resembles the deployment process and configuration used in production environments, which leads to more stable releases.
Solution Structure
Sitecore TDS, much like other Visual Studio projects, allows developers to create both simple and very complex Visual Studio solutions. Since solutions tend to grow in both size and complexity over time, it makes sense to start with a very simple and flat file structure. As the solution grows, keeping the solution files as flat as possible makes it easier to work with, build and deploy.
A typical simple Sitecore solution consists of a Web Project, one or more Class Libraries and one or two Sitecore TDS projects. There are other possible project types that may be added to the solution as needed. As a starting point, only these three will be covered.
- Web Project – The web project holds web assets, configuration files and UI code. These will be deployed to theSitecore web folder by Sitecore TDS when the project is built. This is controlled by setting the Source Web Project in the General project property page. For more information on Sitecore TDS project property pages, please see below.
- Class Libraries – The Class Libraries contain APIs that are used by the UI layer. These usually consist of ORM layers, data access layers, interfaces to other applications and any API’s that may be reused across Sitecore solutions. Adding additional class libraries is the most common way a project grows.
- Sitecore TDS Projects – The Sitecore TDS projects are used to hold Sitecore items and deploy the project. Sitecore TDS can only deploy Sitecore items to a single Sitecore database. Having multiple projects allows Sitecore TDS to manage and deploy to multiple databases (e.g. core and master). When there are multiple Sitecore TDS projects in a solution, the Sitecore Access Guid must be the same for all project configurations pointing at a specific Sitecore instance.
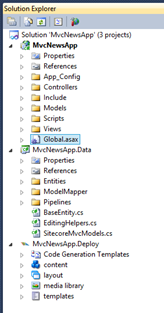
| Sample Visual Studio Project | Solution File Structure. |
|---|---|
 |
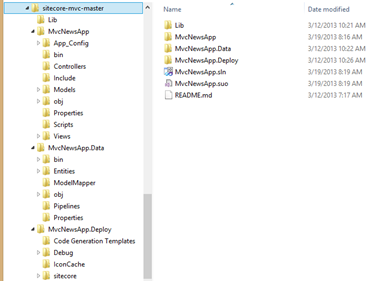 |
| An example of a simple Sitecore solution. | The folder structure for this solution. The file structure closely resembles the solution in Visual Studio. |
In the example above, there is a \Lib folder in the file system. This contains any reference DLL’s needed to build the project. By keeping all resources needed for the project under a single folder, the development team can easily leverage advanced source control features like branching, merging and labeling. Additionally, this structure lends itself to setting up automated builds.
Sitecore TDS project property pages
The Sitecore TDS project property pages are used to connect the Sitecore TDS project to a Sitecore instance and to control how the Sitecore TDS project interacts with other projects in the solution during the build.
General
Contains settings that are common to all project configurations.
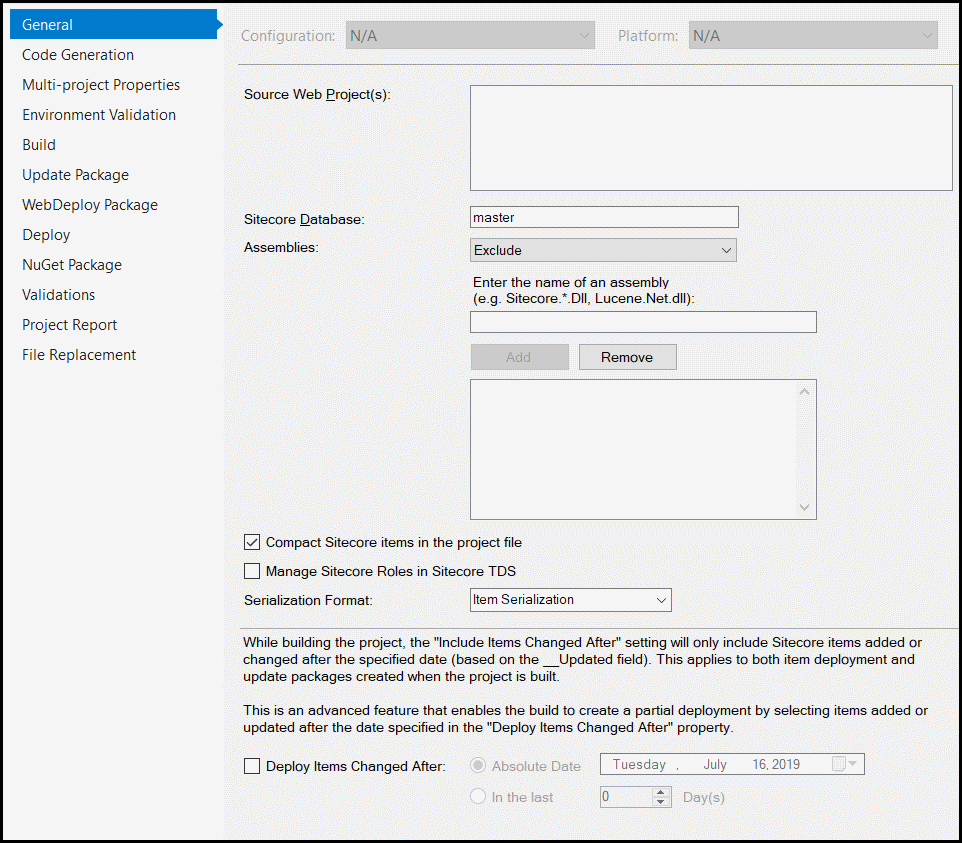
- Source Web Project – This checklist selects the web project or projects to copy to Sitecore when the Sitecore TDS project is built. If there is no need to copy files to Sitecore, please leave all projects unchecked. When building a package, content files and binary assemblies from the selected web project(s) are added to the package.
- Sitecore Database – Configures the Sitecore database the Sitecore TDS project will use.
- Assemblies – When deploying to Sitecore, Sitecore TDS can skip the deployment of certain assemblies. These assemblies may be referenced by one or more projects in the solution. Excluding/including static assemblies from the build will reduce the size of the packages Sitecore TDS generates and improve deployment time. By default, Sitecore TDS excludes assemblies beginning with “Sitecore.”. Selecting Exclude from the drop down will cause Sitecore TDS to skip these files and not add them to the deployment. Selecting Include from the drop down will only include the assemblies listed and cause Sitecore TDS to skip all other assemblies.
- Compact Sitecore items in the project - The MSBuild project file format isn’t handled very well by file merge tools. The item meta data can sometimes confuse merge tools, leading to difficult merges. Enabling this feature compacts all item meta data onto the same line as the item declaration, making it very simple to keep all meta data for an item together.
- Manage Sitecore Roles in Sitecore TDS - Enables the Sitecore Role Sync functionality. This allows you to compare the roles in your Sitecore TDS project to the roles in Sitecore. Roles are deployed and packaged along with your Sitecore items.
- Serialization Format - Allows the developer to select the serialization format used in the project. The default format is Item Serialization. Yml Serialization can be selected if the developer is working with Sitecore 9.2 or higher. Changing the serialization format from Item to Yml will also upgrade the files in the project. For more information please see Upgrading to Yaml
- Deploy Items Changed After - When deploying and/or packaging items, can check the item to see if it should be included in the build/package. When this check box is enabled, __updated field is checked on the Sitecore item and if any version of the __updated field has a date before the absolute or relative date specified in the date selector, it is excluded from the build. This allows Sitecore TDS to create delta deployments.
Code Generation
Used to turn on and control Sitecore TDS Code Generation.
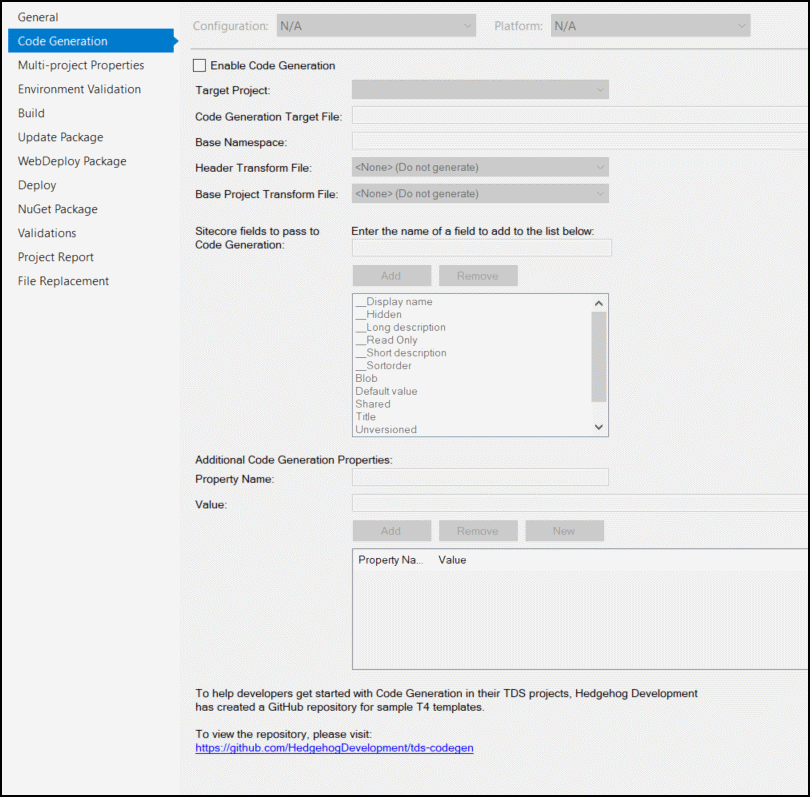
- Target Project – The target project in which the generated code file will be generated.
- Code Generation Target File – The name of the file that will contain the generated code. Remember to add the appropriate extension, e.g. “.cs” for c-sharp files.
- Base Namespace – The namespace that class will be generated in.
- Header Transform File – The T4 template file used to generate the header of the generated file.
- Base Project Transform File – The T4 template file used to generate output for each item in the generated file.
- Sitecore Fields to Pass to Code Generation – Standard Sitecore fields that should be passed to the code generation template. By default standard Sitecore fields are skipped but developer created fields are always passed to the code generator.
- Additional Code Generation properties - Project specific Key/Values properties to pass to the code generation template using a .Net dictionary. These are useful for specifying project specific settings like target namespaces.
Please see the code generation section below for more information on the Code Generation property page.
Multi-Project Properties
The Multi-Project properties page allow you to setup dependencies between projects within the same solution.
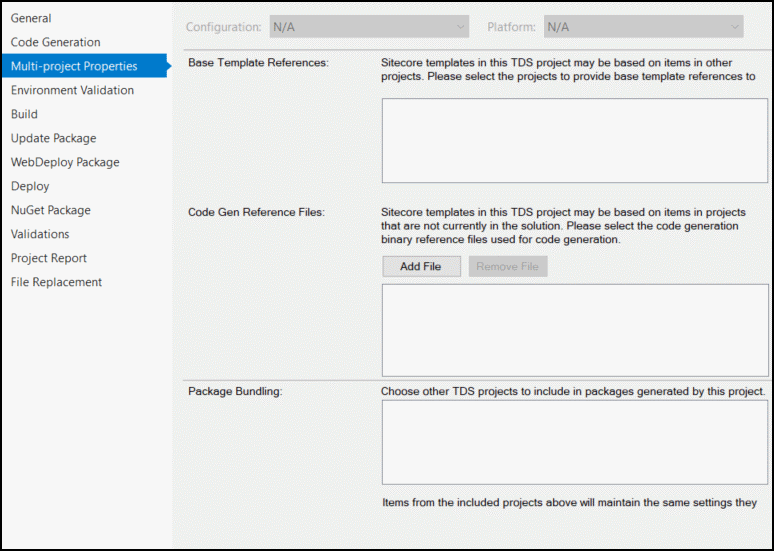
Base Template Reference
The Base Template Reference section can be used to tell a Sitecore TDS project where it should look for base templates when generating code for templates in the current project:
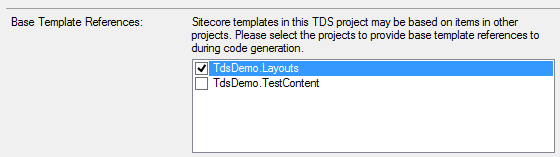
For example, imagine the there is the following project setup with templates T1 and T2. Template T2 inherits template T1 but they are in different projects.
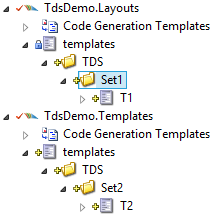
When Sitecore TDS performs code generation we want templates generated by the TDSDemo.Layouts project to be used by the TdsDemo.Templates project.
The generated class for TdsDemo.Layouts will look like this:
namespace TdsDemo.Layouts.sitecore.templates.TDS.Set1
{
    public partial interface IT1
    {
        string F1 { get; set; }
    }
}
And the generated glasses for TdsDemo.Templates will be:
namespace TdsDemo.Templates.sitecore.templates.TDS.Set2
{
    public partial interface IT2 :
                    global::TdsDemo.Layouts.sitecore.templates.TDS.Set1.IT1
    {
        string F2 { get; set; }
    }
}
Notice that the second code generated file references the classes generated by the first.
If the two generated files are in different projects then a reference to the project with the first generated file will need to be added to the second project.
The referencing project must know how to generate the namespaces required by the referenced project. For example if the referenced and referencing project use different methods of generating namespaces then the referencing project may not be able to find the classes in the referenced project.
Code Gen Reference Files
Adding a code generation reference file allows the code generation templates to reference Sitecore templates in other solutions. A code generation reference file is created by right-clicking on the TDS project and selecting “Export Code Gen Reference File”. This will allow the user to select a location and filename for the file.
To add a code generation reference file to a project, select “Add File” and use the file browser dialog to locate the file.
Once the file is selected, the path is converted to a relative path if possible and added to the list.
To remove a file, select it in the Code Gen Reference File list and click the “Remove” button.
Package Bundling
The Package Bundling section can be used to tell a Sitecore TDS to pull in items from another project when creating an Update Package. When Sitecore TDS builds the current project it will automatically add any items in the referenced projects to the update package.
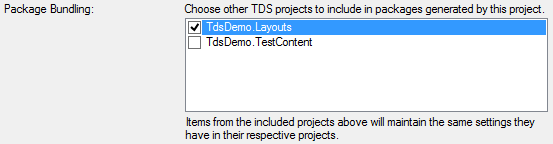
If the referencing and referenced project both contain the same item, the item in the referencing project is used.
Package bundling only works when the Update Package has been configured, see the Update Package section below.
Environment Validation
Many Sitecore projects include Modules distributed as Sitecore Packages. These packages are .zip files and contain compiled code, assets and Sitecore items. In many cases, a Sitecore solution depends on a list of packages being installed on the server. If the packages aren’t deployed, there is a good chance the Sitecore solution would fail. Sitecore TDS Package Validation ensures the package is installed and will fail the deployment if the package isn’t present.
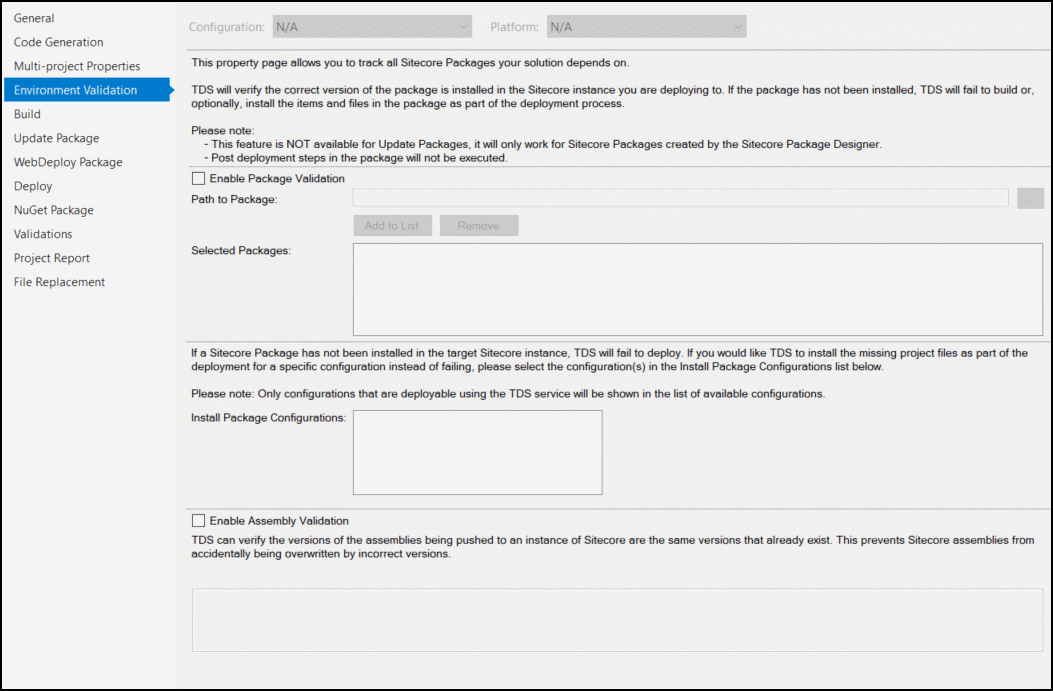
Selected Package
The Selected Package list is the list of Sitecore packages that are required for the solution. The packages must be reachable at build time. Sitecore TDS only checks if the selected Sitecore packages are installed when solution is being deployed. These checks are not performed when an update package is deployed.
If the selected Sitecore packages are not present on the server, the build fails with an error message.
Install Package Configurations
Install Package Configurations shows the available configurations in the Sitecore TDS project. If the configuration is selected in the list, Sitecore TDS will install the package on the server if it is missing instead of failing the build. Please note, package post steps will not run when this package is installed. The only items and files will be deployed.
Assembly Validation
Assembly Validation causes TDS to check the specified assembly versions and terminate the build/deployment if the assemblies being deployed are different than the version in the target folder. This feature is designed to prevent different versions of assemblies from being deployed over the assemblies provided with the installed
Sitecore Assembly Validation
Sitecore TDS now supports the Sitecore Assembly Version nuget packages. These packages are named Sitecore.Assemblies.*, and contain a list of all assemblies used by the released version of Sitecore and the expected version number of each assembly. These are a great resource for ensuring that all assemblies being deployed to Sitecore match the version Sitecore expects.
Sitecore TDS versions 6.0.0.14 and up are aware of these Nuget packages and will automatically check the versions at build time if the package is installed in the TDS project. To take advantage of the new packages check Enable Assembly Validation and add the Sitecore.Assemblies.Platform Nuget package for your version of Sitecore to your TDS project. If any assemblies being deployed to Sitecore are different than the expected version, TDS will flag the assemblies with the incorrect version as build errors.
Build
Contains settings used to connect Sitecore TDS to a Sitecore instance. The settings on this page are different for each project configuration, allowing Sitecore TDS to easily work with multiple Sitecore instances.
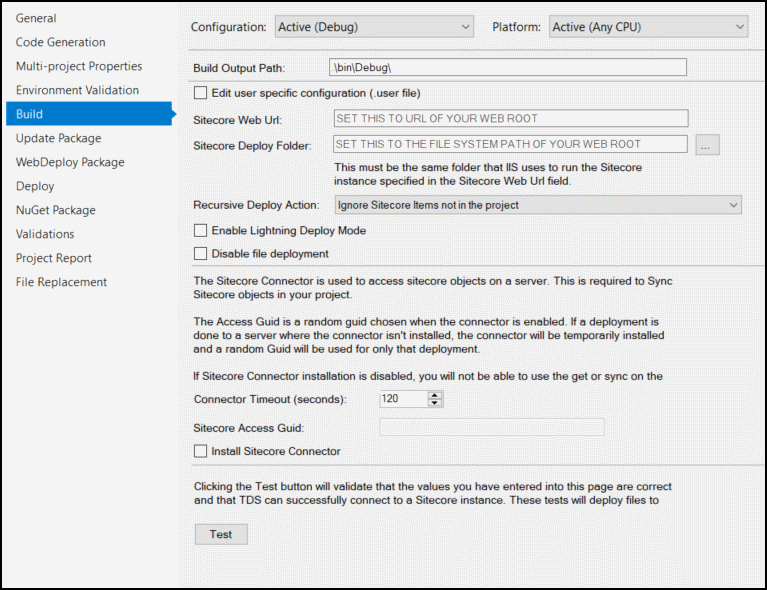
- Build Output Path – Sets the location Sitecore TDS will use to collect the files to be deployed or packaged.
- Edit user specific configuration – When this check box is checked, the user will edit the settings in the .user file instead of the project (.csproj) file. This allows developers to have specific settings for their local Sitecore TDS deployment that are different than other developers on the team without creating a configuration that is specifically for that user.
- Sitecore Web URL – Contains the URL of the Sitecore instance Sitecore TDS is connected to. This URL must be the ROOT of the Sitecore instance.
- Sitecore Deploy Folder – Contains the path to the ROOT of the Sitecore instance on the file system. This setting is used to install the Sitecore TDS service when needed and to deploy the compiled code when the Sitecore TDS project is built.
- Recursive Deploy Action – This setting controls how Sitecore TDS responds to Sitecore items in the target Sitecore instance but not in the Sitecore TDS project. By default, Sitecore TDS will ignore any items in the target Sitecore instance. Changing this configuration setting will allow Sitecore TDS to use an items deployment properties to determine if items in the target Sitecore instance can be deleted. For more information, please see deployment properties below.
- Sitecore Access Guid – Contains the Guid passed to the Sitecore TDS service for all actions involving the service. This Guid must match the configured Guid in the service configuration file located at /_DEV/web.config. When setting up multiple Sitecore TDS projects in a single solution, it is recommended that the Sitecore Access Guid be the same for each project configuration that is connected to a Sitecore instance.
- Install Sitecore Connector – When checked, Sitecore TDS can install the Sitecore service permanently on the configured Sitecore instance. This is needed for the developer features of Sitecore TDS to work correctly. In a configuration that is only used to build or deploy items, this can be left unchecked. If Sitecore TDS needs to install the service, Sitecore TDS will pick a random Access Guid at install time.
- Enable Lightning Deploy Mode - This setting causes TDS deployments to check the Revision ID’s of an item before trying to deploy the item. If the Revision ID’s match, the item isn’t deployed. Enabling this feature can reduce deployment times dramatically if there are few changes to the project.
- Disable File Deployment – Stops Sitecore TDS deploying files to the directory specified in the Sitecore Deploy Folder.
- Connector Timeout - This setting allows the developer to specify the number of seconds TDS will wait for the service to respond. This is useful on Sitecore instances where it takes a long time for the AppPool to recycle.
Sitecore Deploy Folder should point at the location that the Sitecore Web URL is running from. If you select a folder that Sitecore TDS does not think it is a Sitecore web root a warning symbol next the Sitecore Deploy Folder:

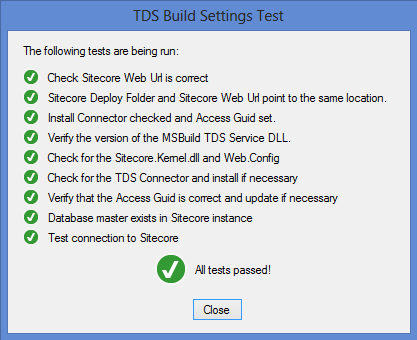
Once you have set the Sitecore Web URL, Sitecore Deploy Folder and checked the Install Sitecore Connector field you can test your settings using the Test button:
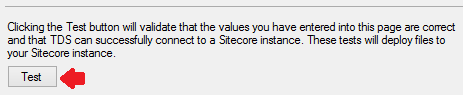
Clicking the Test button will bring up a second prompt that will automatically check that you have configured you Sitecore TDS project correctly:
Update Package
Contains the settings needed to build Sitecore Update Packages.
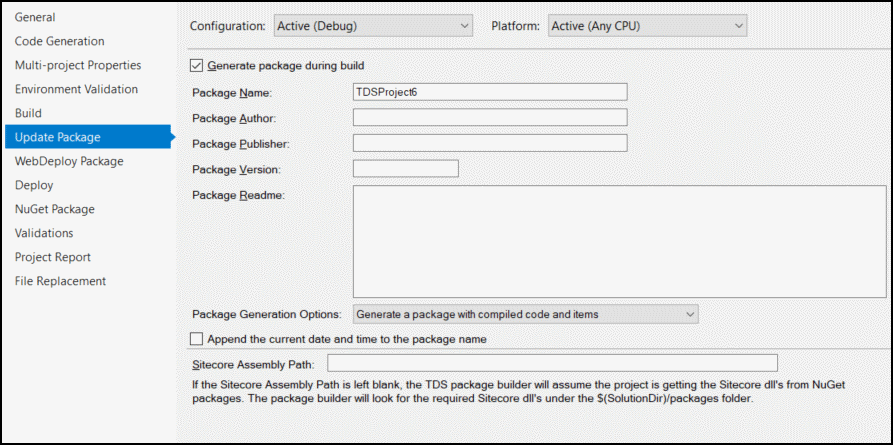
- Generate Package During Build – Enables package generation for the selected build configuration.
- Package Name – The name of the package to generate.
- Package Author – Sets the author field in the generated package.
- Package Publisher – Sets the publisher field in the generated package.
- Package Version – Sets the version number in the generated package.
- Package Readme – Sets the read me field in the generated package.
- Package Generation Options – There are three options for generating a package. They are:
- Generate a package with compiled code and items
- Generate separate code and item packages
- Generate an item only package
- Append the current date and time to the package name – When checked, the package name has the current date and time. This is sometimes useful for associating the package with a specific version or build.
- Sitecore Assembly Path – Sitecore TDS needs to use the Sitecore Update Package Builder to create a package. To do this, Sitecore TDS needs to know where to find the four Sitecore assemblies that make up the Package Builder. These are Sitecore.Kernel.dll, Sitecore.Logging.dll, Sitecore.Update.dll and Sitecore.Zip.dll. This path can be a relative, absolute or network path to these four Dlls.
WebDeploy Package
Contains the settings needed to build WebDeploy packages with Sitecore TDS. These packages can contain both code and items. When the package is installed on a Sitecore server, the package will automatically deploy any items in the package.
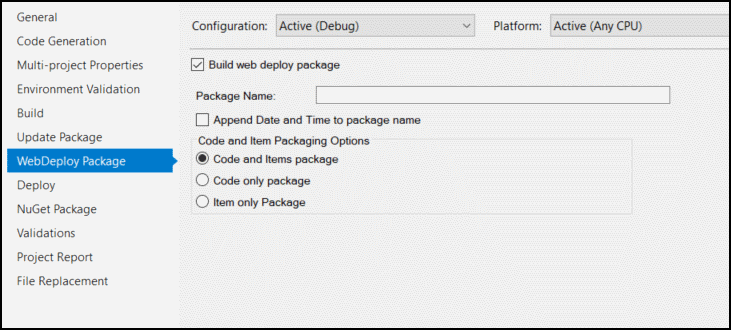
- Build WebDeploy package - Enables building WebDeploy packages during the build.
- Package Name - Allows the developer to specify the name of the package being built.
- Append the current date and time to the package name – When checked, the package name has the current date and time. This is sometimes useful for associating the package with a specific version or build.
- Code and Item Packaging options - Allows the developer to specify the contents of the package at build time.
For more information on deploying packages in Azure and to stand alone Sitecore servers, please see Using WebDeploy packages.
Item Resource File
Contains the settings needed to build ‘Items as Resources’ files.
TDS Deployment options are **not** used with Items as Resource files. All included items in the project will be in the resource file and will be available in the Sitecore instance.
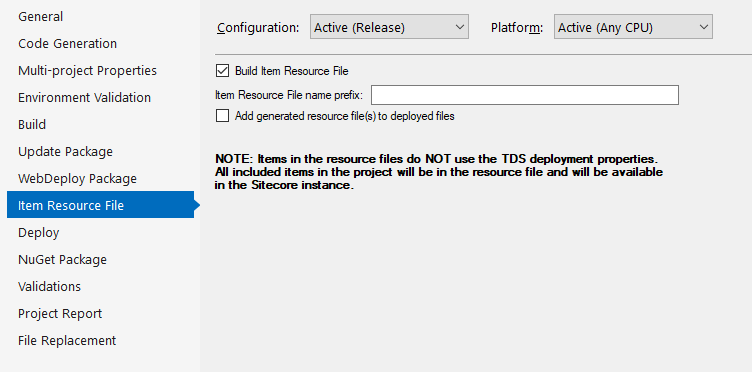
- Build Item Resource File - Enables building of Items as Resources files. (.dat extension)
- Item Resource File name prefix - Allows the developer to specify the prefixed name of the package being built. Filename will be <prefix>.items.<database>.dat.
- Add generated resource file(s) to deployed files - When checked, the Items as Resources .dat file will be added to the deployed files in the App_Data/items/<database> folder. This means they will be copied over if File Deployment is used, or will be included in a package if that package includes ‘code’ in the package generation settings.
Deploy
The Sitecore TDS Deploy property page allows the developer to select actions to perform at deployment time. These actions will be executed for Sitecore TDS Deployments and Package Installation as Post Deploy Steps.
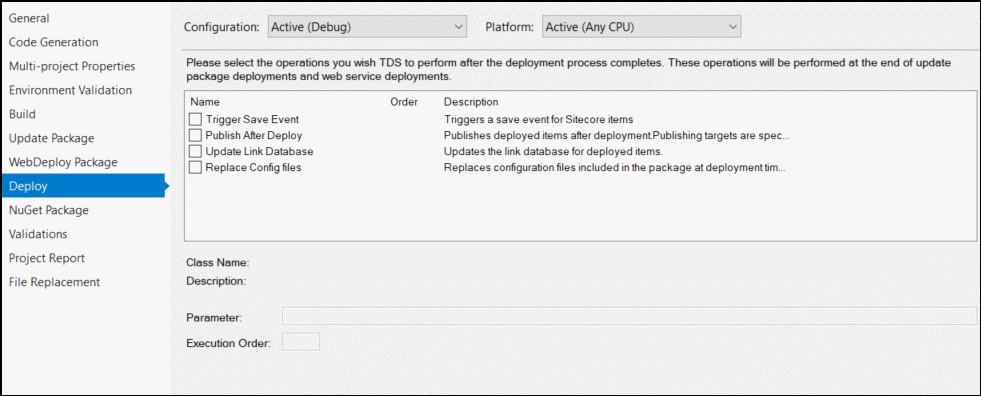
The Deploy property page comes with a few built in functions. These are designed to solve some of the most common problems encountered with package deployments. The built in deploy functions are:
- Publish After Deploy - Adds the deployed items to the publish queue for the publish target(s) specified in the parameter text box. The publish targets are specified as a comma separated list of deployment targets. These should be entered as the ‘Parameter’ values.
- Update Link Database - Adds the items in the deployment/package to the Sitecore link database. This is needed because Sitecore serialization may not update the link database when items are deployed.
- Trigger Save Events - In some cases, Sitecore functionality depends on save events. Since Serialization doesn’t trigger save events, it is difficult for these features to function correctly. Triggering save events helps these functions to work correctly.
- Replace Config Files - Replace the configuration files on the deployment server with the files in the package. This is done because the Sitecore update API doesn’t automatically replace changed configuration files.
Each post deployment action has its own parameter value.
NuGet Package
Sitecore TDS allows developers to create and use NuGet packages the same way they do with other projects. Packages can be created from any Sitecore TDS project by enabling NuGet package generation in the NuGet Package property tab.
The created packages can be uploaded to any NuGet package repository and installed into other Sitecore TDS projects by using the “Manage NuGet Packages…” right click menu on the Sitecore TDS project in the solution explorer.

The NuGet package generation property page allows the developer to set all NuGet package generation options:
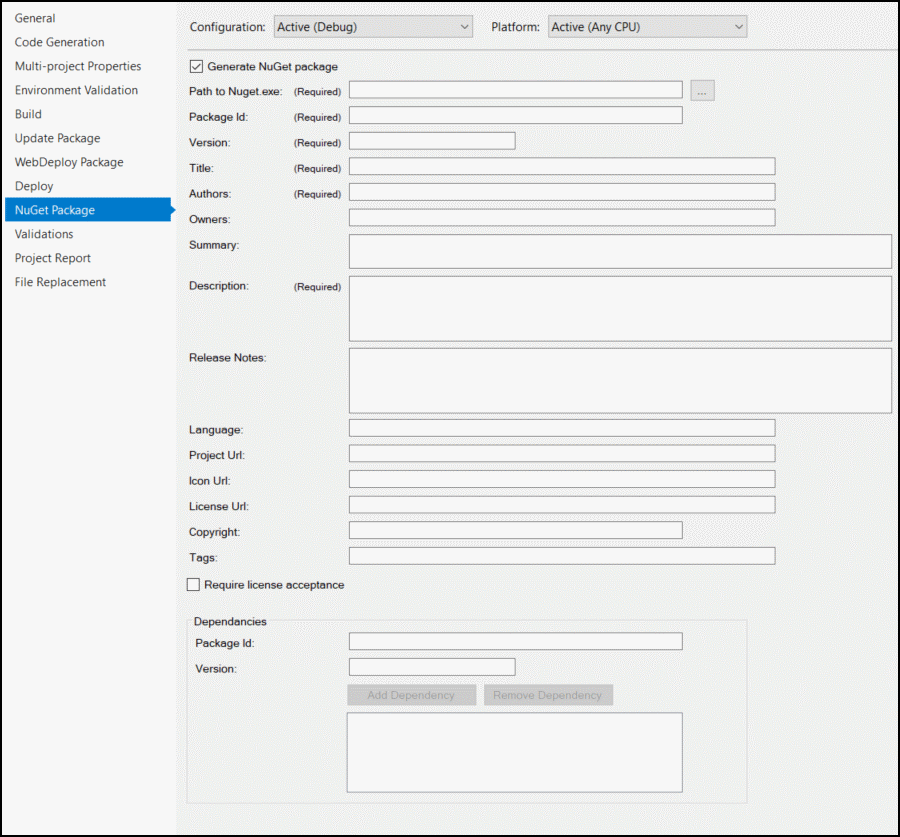
- Generate NuGet package - Enable this check box to create a NuGet package during the build.
- Path to NuGet.exe Sitecore TDS needs to know where to find the NuGet executable. This can be downloaded from the NuGet Download Page or you can add the “NuGet Command Line” package to a project in your solution. The NuGet executable will be located in the [solution dir]\packages folder.
- NuGet Metadata fields - All other fields are NuGet meta data fields passed to NuGet.exe when creating the NuGet package. Documentation for these fields can be found in the meta data reference section of the Nuspec Reference page.
Validations
The Validations tab allows you turn on checks that Sitecore TDS can perform on the project when it is built.
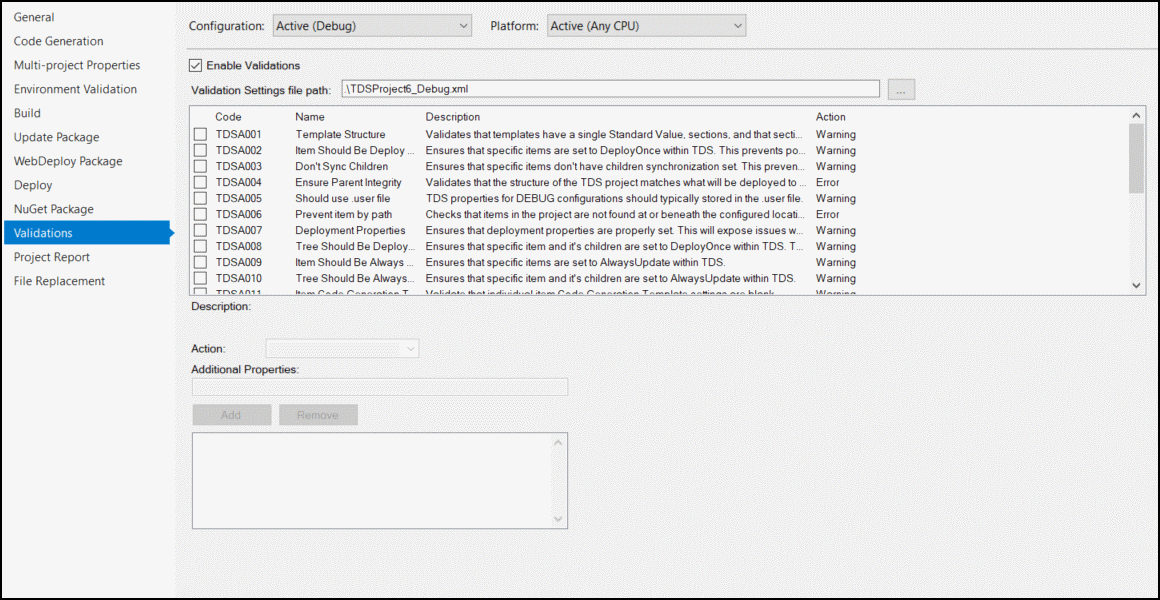
- Enable Validators – Turns on validation for this build configuration.
- Validation Settings File Path - The path to the file containing the settings used by the validators.
- Validators – The list of validators that can be activated.
- Action – Determines if the selected validator should raise a build error or build warning.
- Additional Properties – Allows the setting of additional properties used by each validator, for example item path.
Sitecore TDS supports the following validations:
- Template Structure – Validates that templates have only a single Standard Value template, field sections and sections only contain fields.
- Should be Deploy Once – Ensure that certain items are set to DeployOnce. The paths that the check will applied to can be configured in the Additional Properties area.
- Don’t Sync Children – Ensure that specific items don’t have child synchronization set, this prevents the possible deletion of items. The paths that the check will applied to can be configured in the Additional Properties area.
- Ensure Parent Integrity – Validates that the structure of the Sitecore TDS project matches what will be deployed to Sitecore.
- Should use .user file - Sitecore TDS properties for DEBUG configurations should typically be stored in the .user file.
- Prevent item by path – Checks that items in the project are not found at or beneath the configured location.
- Deployment Properties - Ensure that deployment properties are set. This will expose issues with parent items being excluded from a deployment.
- Tree should be Deploy Once - Ensure that an item and its children are set to deploy once.
- Item should be Always Update - Ensure that a single item should be always update.
- Tree should be Always Update - Ensure that an item and its children are set to deploy always.
- Item Code Generation templates are blank - Ensures that an items code generation templates are blank.
- Prevent illegal characters in fields - Checks all fields for illegal characters like 0x03 that can cause problems when building packages.
- Prevent Deploy Once Standard Values - When Sitecore deploys a package, it forces __Standard Values items to be deploy always. This setting flags any __Standard Values items that are set to Deploy Once as errors to prevent inconsistencies in deployment environments.
- Prevent Zero Length __Final Rendering field - Checks for Zero Length final rendering fields.
- Helix Features don’t reference other Features - Makes sure items in a helix feature namespace do not reference items in other helix feature namespaces.
- Helix Projects don’t reference other Projects - Makes sure items in a helix project namespace do not reference items in other helix project namespaces.
- Helix Foundations don’t reference Features - Makes sure items in a helix foundation namespace do not reference items in the helix feature namespace.
- Helix Features don’t reference Projects - Makes sure items in a helix feature namespace do not reference items in the helix project namespace.
- Helix Foundations don’t reference other Projects - Makes sure items in a helix foundation namespace do not reference items in the helix project namespace.
- Ensure all item files are in the project - Occasionally when merging branches, item files may be merged into the project folders, but not actually added to the project file. This validator will generate a build error if any files are found in the folder structure but not in the project.
Project Report
The Project Report property page enables generation of a project report at build time. This report will contain information about each item in the project. This is useful for documenting the items in a solution.
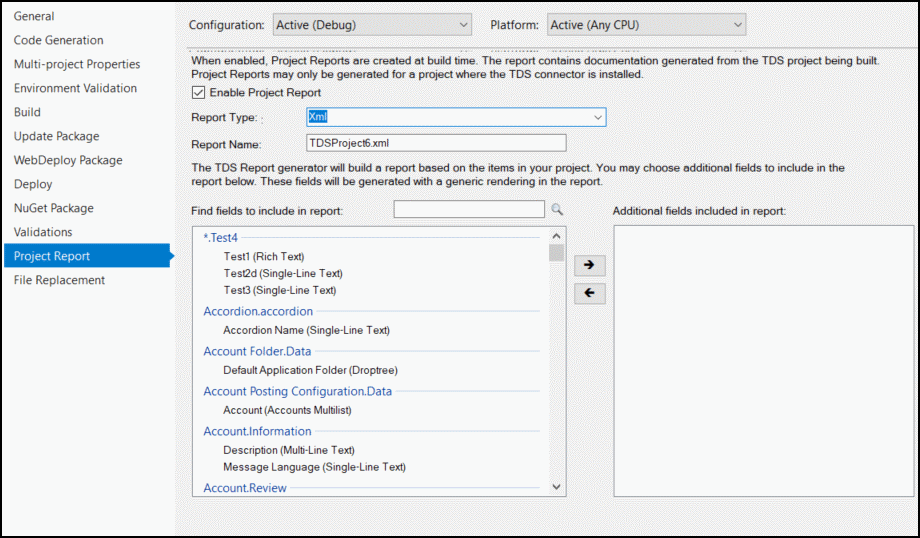
- Enable Project Report - Enables report generation at build time.
- Report Type - Selects the type of report to generate. Currently, there are two report types. Markdown and XML. While the format of the generated reports is fixed and not easily changed, the XML format can be parsed an adapted as needed. In addition, the XML report will also create an XSLT to convert the XML into HTML so it can be shown in a browser. If you wish to change the HTML displayed, you should edit the XSLT as needed.
- Report Name - Allows the user to specify the name of the report.
- Fields to include in report - Allows the user to pick fields from Sitecore to include in the report. These fields are in addition to the fields normally included in the report, and can vary based on the implementation. Use the left and right arrows to select/un-select the fields for the report.
- Field Search Box - There is a search box above the field list. As you type into the search box, the field list will automatically update to show only fields contain the characters in the search box. This makes finding and selecting fields easier.
File Replacement
Allows the Sitecore TDS project to be configured to automatically copy files into the build folder before deploying the built project. This is useful for managing environment specific configuration files. The File Replacement step runs after the web project has been built and copied, but before package generation and/or deployment to Sitecore.
File replacements is not compatible with multiple source web projects. If a file replacement exists in a project with multiple source web projects, the build will fail with an error tell the user to disable either file replacements or multiple souce web projects.
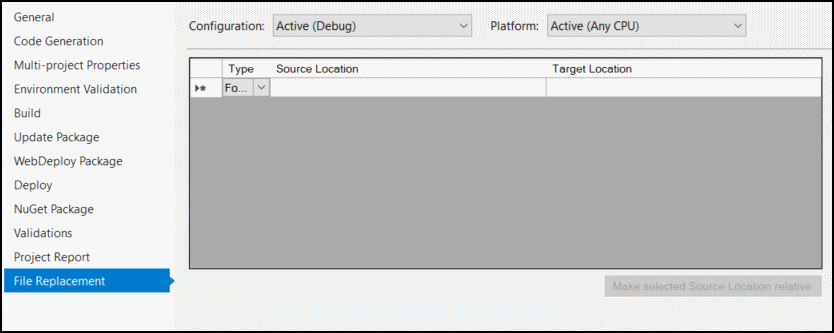
- Type – The type drop down allows you to choose the type of the Source Location. If you choose “File”, the individual file specified in the Source Location is copied to the Target location. Choosing “Folder” causes all items under the Source Location to be copied to the Target Location.
- Source Location – Specifies where to copy files from. The path can be relative to the project folder or an absolute path.
- Target Location – Specifies the location to copy files to. The path for the target location can be relative to the build output folder or an absolute path.
To delete an item from the replacement list, select the row using the row selector on the left and press the <delete> button.
Deployment Properties
A Sitecore TDS project contains many different types of Sitecore items. These items all serve different purposes in the Sitecore implementation, and it is likely they need to be treated differently at deployment time. Developers can easily manage how each Sitecore item in the Sitecore TDS project is deployed through Deployment Properties.
Setting deployment properties can be time consuming. Sitecore TDS was designed to help developers with this process by intelligently choosing default values for deployment properties. If an item is added under an existing item, Sitecore TDS will set the new items deployment properties to have the same values as the parent item.
Visual Studio Property Window
Deployment properties are managed for an individual item in the Visual Studio property window. The property window is opened by right-clicking on an item and selecting properties. It may also be opened by clicking on an item and pressing the F4 key.

- Child Item Synchronization – Sometimes it is necessary to remove Items from Sitecore as part of a deployment. This property controls how Sitecore TDS responds to Sitecore items in the target Sitecore that are not present in the Project. There are three choices for this property.
- NoChildSynchronization – When this option is chosen, Sitecore TDS will ignore any Sitecore items in the target Sitecore that are not in the Sitecore TDS project.
- KeepAllChildrenSynchronized – When this option is chosen, Sitecore TDS will remove Sitecore items under the current item in the target Sitecore if the items don’t exist in the Sitecore TDS project. When set, this setting applies to the current item and all items under it.
- KeepDirectDescendantsSynchronized – This option is very similar to KeepAllChildrenSynchronized. The main difference is that it applies to only the items directly under the current item, and will not be applied to items further down in the content tree.
How items are removed from the project by the Child Item Synchronization settings are controlled by a project configuration setting on the Build property tab.
The Recursive Deploy Action setting determines the action Sitecore TDS will take when an item should be removed. The default setting is to take no action, which effectively disables this feature. The recommended setting is "Move the item to the Sitecore Recycle Bin", which allows developers to easily recover from problems with these settings.
It is recommended that the Sitecore databases are backed up before beginning any deployment regardless of the Recursive Deploy Action setting.
- Code Generation Template – Allows the developer to specify a particular template to use for code generation with this item. See the Code Generation section for more information.
- Custom Data – meta data that will be passed to the code generator. See the Code Generation section for more information.
- Deploy Always Fields – In some cases, developers may want to deploy only a few fields for an item, and not the entire item. This is useful when a Sitecore item is acting as both taxonomy and content and the development team wants to update a field like insert options or permissions on the item.
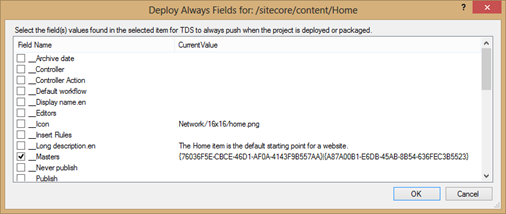
When the developer edits the Deploy Always Field, the above dialog is opened. Any field on the item can be chosen to always be deployed from this dialog. This setting is only available if the item is set to Deploy Once (see Item Deployment below). - Exclude Item From – This setting allows the developer to choose to exclude an item from a specific project configuration. This can be used to create test content items that the development team would use during development. The test items could be excluded from the production project configuration, preventing them from being deployed in that environment. This feature is very much like a conditional compilation directive in a code file.
- File Name – The name of the file that contains the item information on disk.
- File System Alias – The file system name to use when an items name is to long. This property is used to get around the file path limit in Windows by allowing the developer to specify a shorter name.
- Full Path – The full disk path to the file that contains the information about the item.
- Item Deployment – This setting determines if an item should be deployed to Sitecore based on its presence in the target Sitecore instance.
- Never Deploy - This option allows the developer to create an item that will never be deployed. This item will act as a “placeholder” for child items in the content tree. This is useful for the Sitecore items in the root of the content tree.
- DeployOnce – When this option is chosen, an item will not be overwritten during deployment. This is useful for setting up new sections of the content tree. A new section or meta-data could be created with the proper permissions and insert options during a deployment. Content editors can update the item and future deployments will not overwrite their changes.
- AlwaysUpdate – When this option is chosen, the item will always be updated during deployment. This is normally used for Sitecore schema items like Templates, Layouts, Sublayouts and Renderings.
- Namespace – A custom namespace to use with code generation. See the code generation section for more information.
- SitecorePath – The path to the item within Sitecore.
Sitecore TDS Options Window
The Sitecore TDS Options Window allows you to access global settings for Sitecore TDS, these settings will apply across all Visual Studio instances.
To access the Sitecore TDS Option Window click on the Tools menu then Options. TDS Options will be visible in the left hand list:
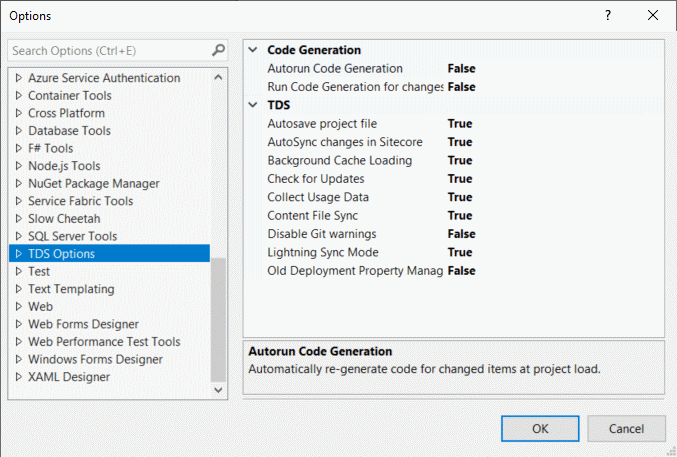
General Options

The following options are available in the General Options screen:
- Autorun Code Generation – Indicates if code generation should automatically run when new items are added to a Sitecore TDS project or an items custom properties / namespace change. Setting this value to false will required a developer to manually run code generation.
- Run Code Generation for Changes - Causes code generation to run after items are changed in the project. If this is set to ‘False’, the developer will have to manually re-generate code from the project right-click menu.
- Autosave Project File – When set to ‘True’ the project file will automatically save when items are added to the Sitecore TDS project file or items are synced.
- AutoSync changes in Sitecore - When set to true, Sitecore TDS will automatically update fetch any changed items in the project file. Sitecore TDS uses the history table for this, so Sitecore TDS will update the project with items that were changed even if the items were changed when the project was closed. The rules Sitecore TDS uses to update the items are the same rules Sitecore TDS uses when the user chooses ‘Sync Using History’. The auto sync function behaves as if the use choose Sync Using History and accepted all changes in the order they were made.
- Background Cache Loading - When set to True, Sitecore TDS will parse Sitecore items in the background at load time. This dramatically speeds up the load time of large solutions.
- Check for Updates – When set to ‘True’ Sitecore TDS will check for updates when a solution is loaded and prompt the developer when an update is available.
- Collect Usage Data - To help make TDS better, TDS can collect completely anonymous data on the features of TDS that are in use. For more information on the feature, please contact support@hhog.com.
- Content File Sync - When set to ‘True’, Sitecore TDS will watch the Source Web Project specified in the General property tab for changes to content files (cshtml, aspx, ascx, css, js, config, etc…) and automatically copy those files to the correct location in the Sitecore Deploy Folder specified in the Build property tab.
- Disable Git Warnings - Disable warning messages about Git merge configuration when using Git.
- Lightning Sync Mode - Enables TDS Lightning Sync, which checks Revision ID’s of items before attempting to perform a sync operation.
- Old Deployment Property Manager - Switches the new Deploy Property Manager off and allows the developer to use the previous version of the Deployment Property Manager.
Sync Window
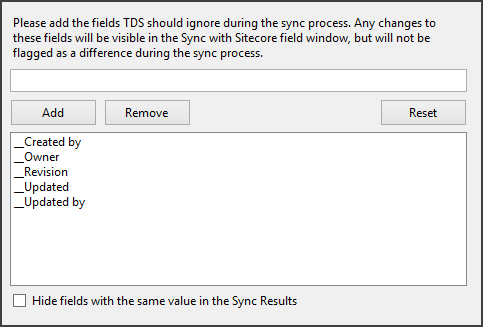
The Sync Window screen allows you to set a list of fields that should be ignored when comparing items. Items with differences only in these fields will not show up in the Sync Window as being different.
Checking the Hide fields with the same value in the Sync Results will stop fields with identical values from being displayed in the Sync Window, this can make it easier to compare items.
Sync Window Languages
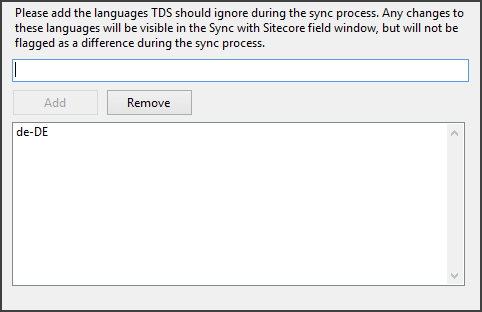
The Sync Window Languages screen allows you to manage a list of languages that should be ignored when comparing item. Items with differences on languages will not should up in the Sync Window as being different.
This behaves very similar to the ignore fields window.
Deployment Property Manager
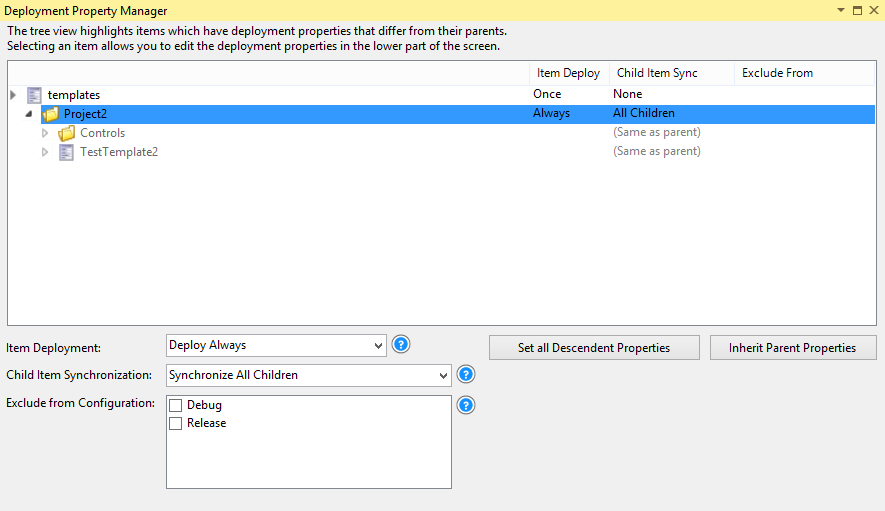
The Deployment Property Manager allows developers to view and update deployment properties on many items at one time. This is a much more convenient way of managing deployment properties.
The Deployment Property Manager can be opened by right-clicking on the Sitecore TDS project or any Sitecore item in the Solution Explorer and choosing “Deployment Property Manager”. This opens a window showing the Exclude Items From, Child Item Synchronization and Item Deployment properties for all the Sitecore items under the item selected in the Solution Explorer. Initially, the Deployment property manager only shows Sitecore items with deployment properties that are different than their parents properties. Expanding the items in the tree will show all Sitecore items under the expanded item. Collapsing the item will hide any items that have the same properties as their parents.
For an explanation of the various options for each of the properties, please see the descriptions in the Visual Studio Property Window section
The Set Descendant Properties button will change the deployment properties of all Sitecore items under the selected item to have the same deployment properties.
The Inherit Parent Properties button will set the current item to have the same deployment properties as its parent.
Clicking either of the buttons will potentially change the visibility of items in the tree view because their properties are being changed.
Adding Sitecore items to a project
Sitecore TDS helps developers to manage their Sitecore items. To do this, the items the development team wants to manage must be brought into the Sitecore TDS project. This can be done with the Get Sitecore Items dialog and the Sync Window (see below).
The Get Sitecore Items dialog can be opened by right clicking on the Sitecore TDS project or a Sitecore item in the Solution Explorer window. The dialog will show the Sitecore content tree. Developers can browse the tree and select items to bring into their project by using the check boxes to the left of the Sitecore item.
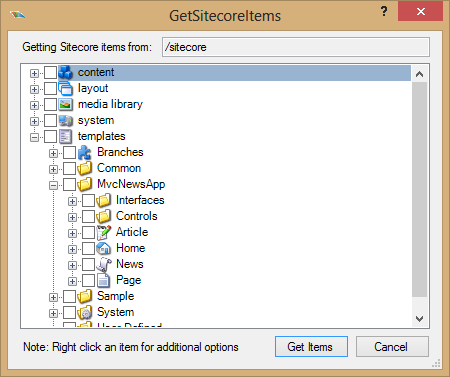
The Get Sitecore Items dialog implements a number of features to make it easier to bring items into a project.
- Any items already in the project are shown with a light colored font. See “templates” and “content” in the sample image.
- If an item is selected in the tree, the dialog always selects all parent items.
- If an item in unselected in the tree, the dialog always unselects all child items.
- All items have a right click menu that allows the developer to select all child items.
When an item has been selected using the right-click menu to select all child items, Sitecore TDS will automatically set the Child Item Synchronization setting in the items to KeepAllChildrenSynchronized.
After selecting the items from the Sitecore content tree, the developer can click the “Get Items” button and the selected items will be added to the project.
Correctly choosing the Sitecore items to bring into a project is very important. Adding the wrong items to a Sitecore TDS project will make the project difficult to maintain and deploy. Please review the section Choosing which items to bring into a Sitecore TDS project for guidelines on choosing which items to add to Sitecore TDS.
Updating Sitecore Items in a project
As a Sitecore implementation grows, developers will add or make changes to items in their Sitecore development environment. Sitecore TDS offers developers a way to track these changes and bring them into their Sitecore TDS project. This is done by using the Sync Window.
The Sync Window
To open the Sync Window, right click on the Sitecore TDS project or any item in the Solution Explorer and select Sync with Sitecore, the sync window will then begin comparing the item and its descendants in the Sitecore TDS project to the Sitecore instance for the current project configuration.
When the compare process is complete, the sync window will show the items that are different between the project and Sitecore. You can compare just the select item by clicking Sync this Item instead of Sync with Sitecore.
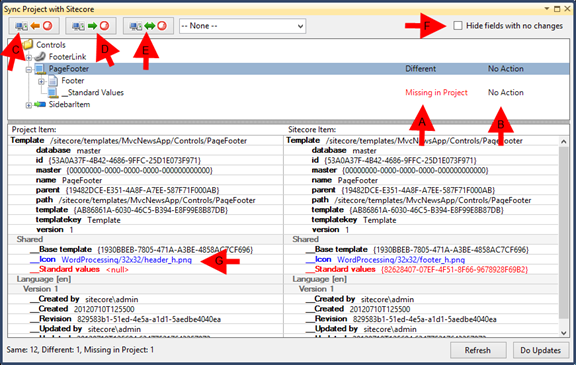
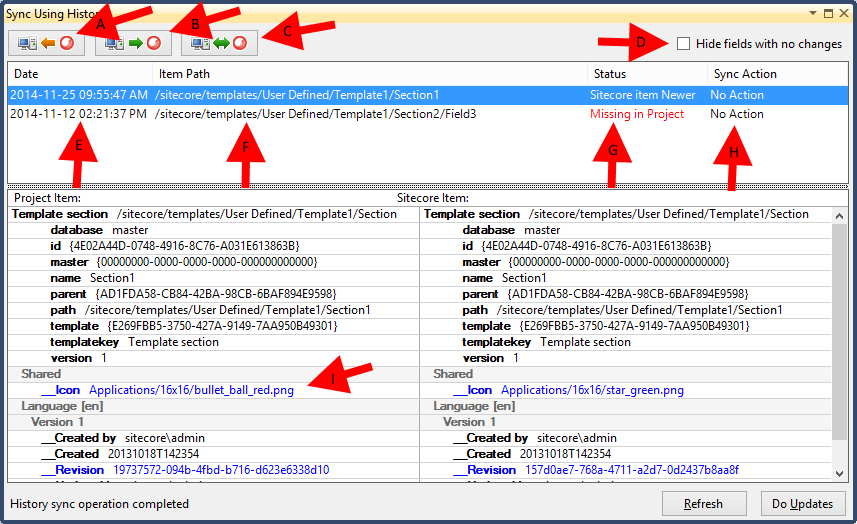
The Sync Window allows developers to inspect the differences between Sitecore and the Sitecore TDS project and determine what to do about those changes. The developer may select individual items, or multi-select items using standard windows selection keys (<shift> and <ctrl>) and choose an operation to perform on the items. If an item is collapsed and selected, it will be assumed by the Sync Window that all items under the item are selected as well. Once the developer has selected the operation to perform on each item, they can click on “Do Updates” to perform the actions.
- A: If there is a difference between the Sitecore TDS project and Sitecore, it will be noted here.
- B: The developer can select an action to perform by clicking on the text in this column and selecting the appropriate action from the drop down. By default, Sitecore TDS will always choose “No Action”.
- C: The “Make selected project items match Sitecore” button causes all selected items to choose the action that would make the project items match the Sitecore items.
- D: The “Make selected Sitecore items match project” button causes all selected items to choose the action that would make the Sitecore items match the project items.
- E: The “Merge fields during update” button causes a merge window to open when updating Sitecore. The merge window allows the developer to choose to update only selected field values instead of the whole item.
- F: The “Hide fields with no changes” check box causes the item differences pane in the lower half of the sync window to only show fields that are different.
- G: Highlights changes between the project and Sitecore. Missing fields are shown in red, different fields are blue.
The Sync Window uses the **Child Item Synchronization** setting to determine if it should look for new items under an existing Sitecore item. This feature of Sitecore TDS is an optimization to prevent large content trees that are not part of the Sitecore TDS project from being scanned during a sync operation.
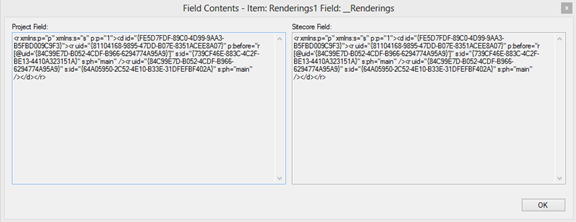
If you are comparing fields with large amounts of data the Sync screen will display a grey button next to the field that will allow you to see the full field contents:

Click the icon will open another dialog that shows the full contents of the field:
Keyboard Shortcuts
The Sync Window has the following keyboard shortcuts when you have selected an item:
| Key Combination | Action |
|---|---|
| Shift + left arrow | Update project |
| Shift + right arrow | Update Sitecore |
| Shift + up arrow | Merge items |
The Merge Window
The merge window allows the developer to pick individual fields from a Sitecore item and move them into the Sitecore TDS project. This is useful for resolving changes multiple developers have made to an item.
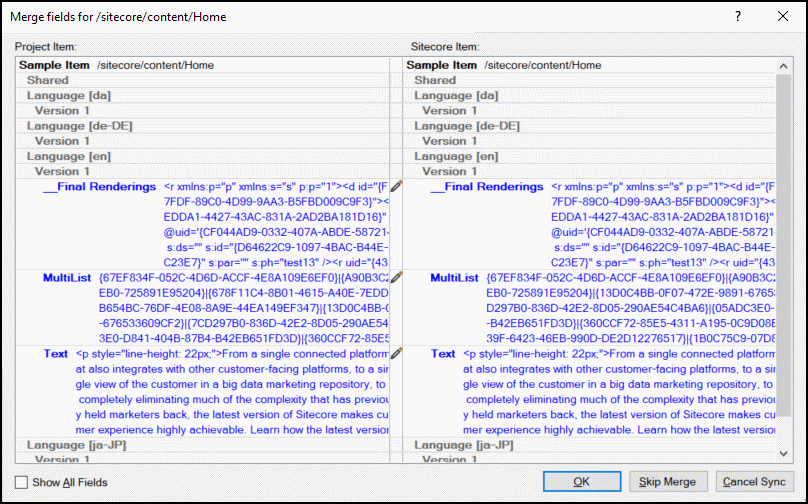
The developer can pick which field value they wish to use by clicking on the edit icon and choosing the value in the field merge window.
There are three types of field merge windows. They all look very similar, but perform different functions.
Xml Field Merge
The Xml or presentation field merge window allows the user to merge individual Xml elements in an Xml field. This is very useful for merging presentation details or tracking fields.
All guid values in the Xml are checked to see if they refer to known Sitecore items and their values are replaced with the Sitecore path. This only happens at display time and the guid values are preserved in the field
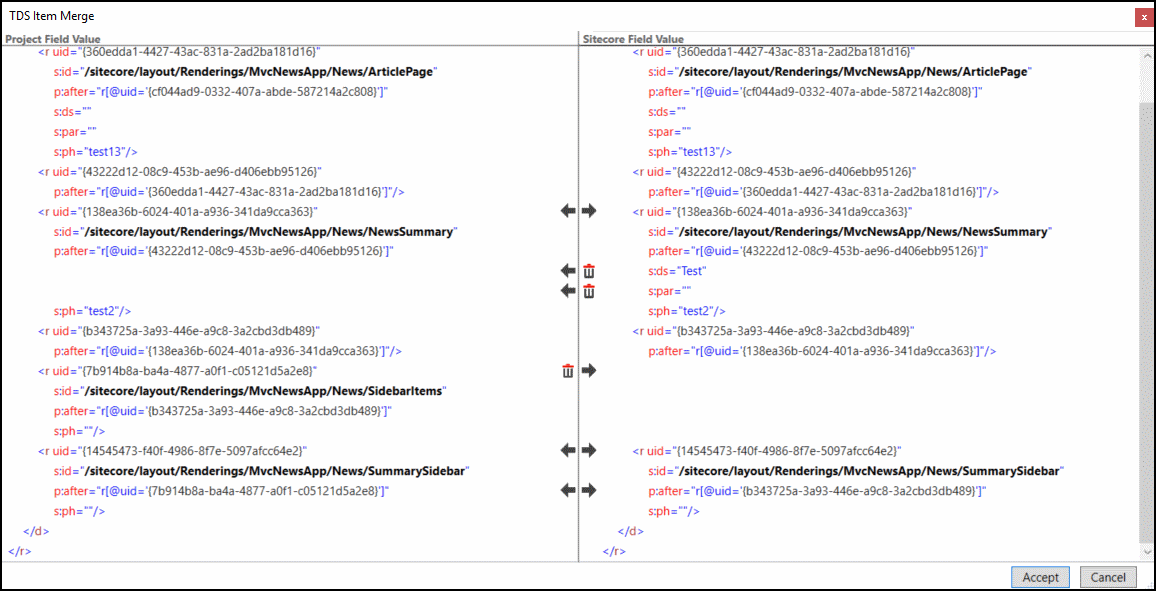
The developer can use the arrow keys to copy an element from the project to Sitecore, or use the trashcan to remove the element from the xml
Multi-List Merge
The Multi-list merge window shows the differences between multi-list items in the project and in sitecore and allows users to move the items between the two. In a multi-list, items are stored as Guids, but the merge window will show the items as Sitecore paths to make merging the values easier.
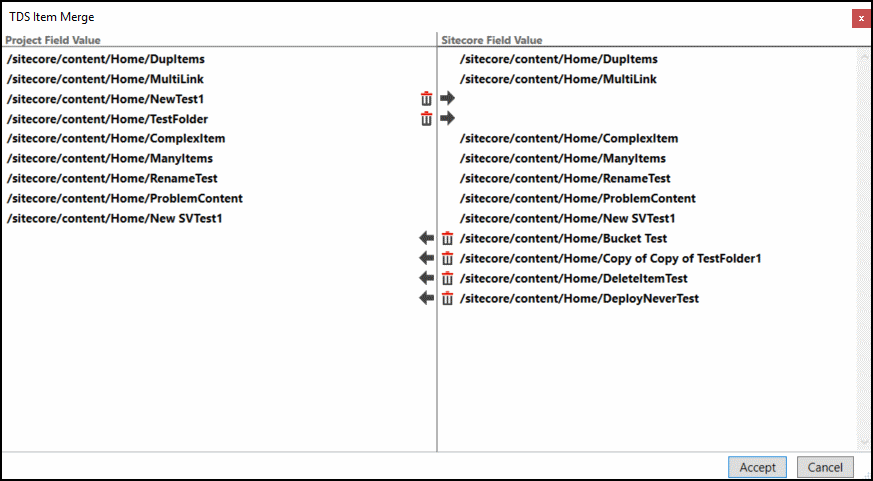
The developer can use the arrow keys to copy an element from the project to Sitecore, or use the trashcan to remove the element from the xml
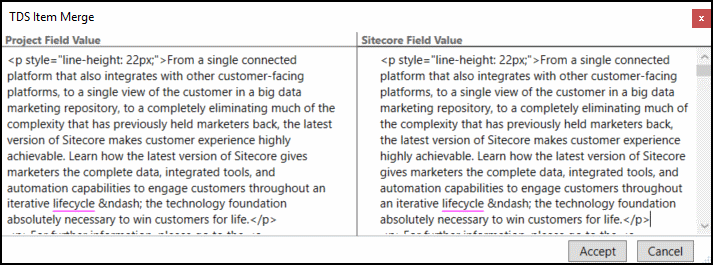
Text field merge
The text field merge window is used for all other field values. The user can edit either side in a simple text editor.
When the developer has completed their selection, they can click OK to accept the changes. Selecting “Skip Merge” will not perform the merge action. The “Cancel Sync” button will abort the sync process. This will skip any updates that have not been performed yet.
Keyboard Shortcuts
The Merge Window has the following keyboard shortcuts when you have selected a field:
| Key Combination | Action |
|---|---|
| Shift + left arrow | Update project |
| Shift + right arrow | Update Sitecore |
Renaming Items
Due to the nature of Sitecore items, renaming a Sitecore item will cause cascading changes to all items below the renamed item. While Sitecore TDS handles these changes correctly, the source control system used by the development team may have issues with the changes made to the project. At Hedgehog Development, we recommend that renaming Sitecore items be performed separately from other sync operations. If possible, each rename operation should be committed to source control individually before performing any additional sync steps. Following these guidelines should reduce the number of problems encountered while renaming items.
Moving Items
Moving Sitecore items is very similar to renaming Sitecore items, and the guidelines for renaming Sitecore items also applies to moving items. When moving items, there is an additional requirement that the developer must sync from a folder that is an ancestor of the location where the moved item originated and the location where the moved item currently resides. This will ensure that the move operation on the item is correctly recognized.
Sync all projects
If your solution has many TDS projects in it, syncing each project individually could be vary time consuming. To sync all projects at once, right click on the solution and select the Team Development for Sitecore -> Sync all projects with Sitecore menu.

This will open the sync window, but all projects in the solution will be checked for differences.
Sync Using History Window
The Sync Using History Window allows the developer to view their changes based on the content of the Sitecore History table. This sync window works much like the original sync window; the major upgrade of the Sync Using History Window is focused around its performance over the original sync window. Since the Sync Using History Window is only viewing items in the history table, it can find changes made by the developer much more rapidly.
The Sync Using History Window will intelligently filter the content of the history table before presenting them to the user. The filter criteria for showing an item in the Sync Using History Window is based on the following:
- After right-clicking on the solution and choosing the option to open the Sync window, all items under that project’s Sitecore item will be shown.
- If the item is in the project.
- If the item in the history is under a Sitecore item in the project that has Child Item Sync set to All Children.
If an item, in the history table, meets these criteria, then its latest history entry is shown in the top portion of the dialog.
Here are the new buttons in the Sync Using History Window (see above image):
- A: The “Make selected project items match Sitecore” button causes all selected project items, in the project, match their corresponding Sitecore items.
- B: The “Make selected Sitecore items match project” button causes all selected Sitecore items, in the project, to match their corresponding project items.
- C: The “Merge fields during update” button causes a merge window to open when updating Sitecore. This merge window allows the developer to choose to update only selected field values instead of the whole item.
- D: The “Hide fields with no changes” check box causes the item differences pane in the lower half of the sync window to filter out fields that match, only showing fields that are different.
- E: The “Date” column contains the date of the most recent change to the item. Only the most recent changes are shown in the list.
- F: The “Item Path” column contains the current path to the item.
- G: The “Status” column describes the difference between the item in Sitecore TDS and the item in the target Sitecore instance.
- H: The developer can select an action to perform by clicking on the text in this column and selecting the appropriate action from the drop down. By default, Sitecore TDS will always choose “No Action”.
- I: The developer can review the changes to an item in more detail in the lower pane. After selecting the desired operations, clicking the “Do Updates” button performs the actions on the items.
Please Note: The Sync Using History Window will only find changes based on the content of the history table. This means that Sitecore operations that do not make an entry in the history table, such as Serialization, will not be included in the window.
Sync All Projects Using History Window
If your solution contains many Sitecore TDS projects, ensuring all projects are up to date can be done using a single Sync operation. Sync All Projects Using History looks at all changes in Sitecore and checks them against all Sitecore TDS projects in the solution using the same Sync rules as the Sync Using History function.
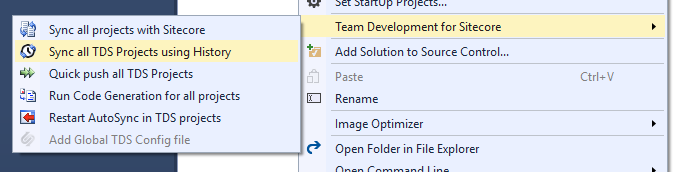
To start syncing all projects, right-click on the solution in the Solution Explorer and choose “Sync all Sitecore TDS Projects using History”
Sitecore TDS will open a sync using history window with an additional “Project” column, indicating which project the changes in Sitecore belong to.
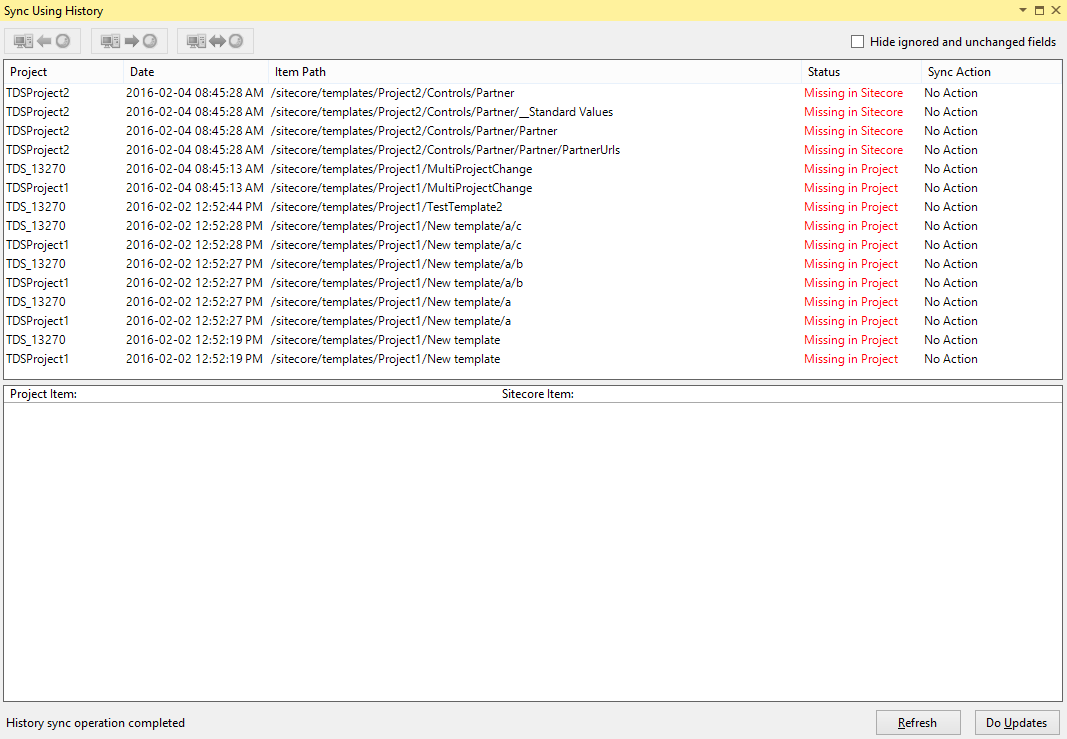
All functions of the Sync All Projects Using History window work exactly the same as the Sync Using History window. For an explanation of how to use the window, please see above.
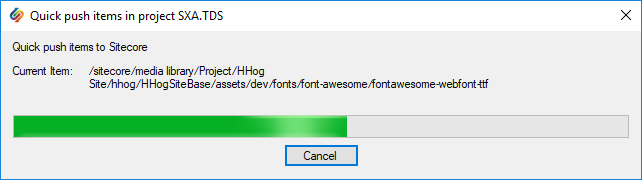
Quick Push Items
The Quick Push Items function is designed to quickly deploy Sitecore items from the project into Sitecore. No code is pushed, only items. The items are pushed in dependency order to ensure that templates are pushed before content and/or other templates that depend on them.
Quick push is accessed from the right-click menu on the project:
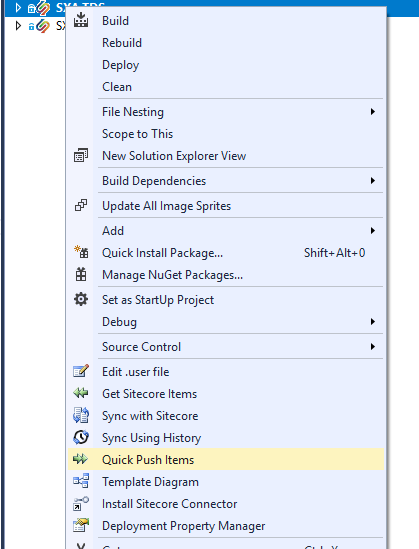
This will open the quick push dialog and immediately start pushing items to Sitecore:
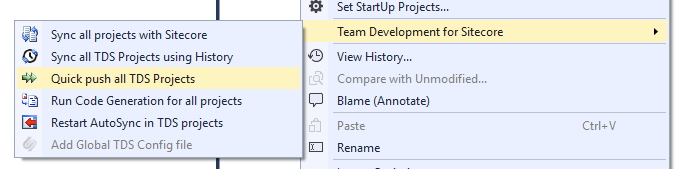
If you have a large number of TDS projects, you can use the Quick push all TDS Projects menu found by right clicking the solution in the solution explorer and opening Team Development for Sitecore -> Quick push all TDS Projects.
Sync Sitecore Roles
The Sync Sitecore Roles window allows the developer to compare all roles in Sitecore with the roles in the Sitecore TDS project, much the same way Sitecore items are managed. Before using the Sync Sitecore Roles feature, it must be enabled for the project.
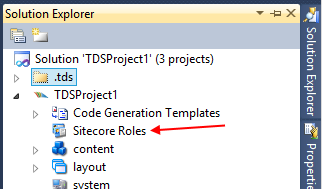
- This is done by opening the Sitecore TDS project properties and, on the General Property tab, enabling the “Manage Sitecore Roles in Sitecore TDS” check box.
- Once this is enabled, a “Sitecore Roles” folder will appear under the Sitecore TDS project in the solution explorer.
Right clicking on the “Sitecore Roles” folder will open a menu with an option called “Sync Sitecore Roles”. Choosing this option will open the Sync Sitecore Roles window.
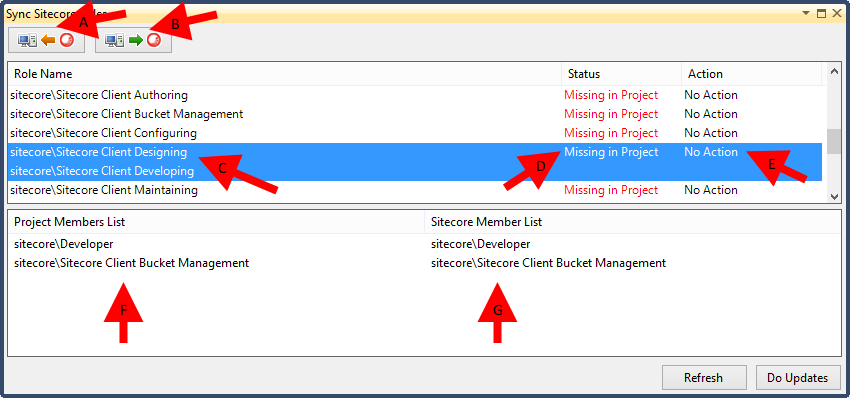
The Sync Sitecore Roles window operates much like the other Sitecore sync windows. Since there are far fewer roles in Sitecore than items, the Sync Sitecore Roles window is much simpler.
- A: The “Make selected project items match Sitecore” button causes all selected project items, in the project, to match their corresponding Sitecore items.
- B: The “Make selected Sitecore items match project” button causes all selected Sitecore items, in the project, to match their corresponding project items.
- C: This column contains the name of the role.
- D: The “Status” column describes the difference between the item in Sitecore TDS and the item in the target Sitecore instance.
- E: The developer can select an action to perform by clicking on the text in this column and selecting the appropriate action from the drop down. By default, Sitecore TDS will always choose “No Action”.
- F: Shows the members that are part of the role in the project.
- G: Shows the members that are part of the role in Sitecore.
After selecting the desired operations, clicking the “Do Updates” button performs the actions on the roles.
Roles in the Sitecore TDS project can be deployed using Sitecore TDS, or compiled into an update package for deployment on a remote server.
TDS Solution Features
Sitecore TDS adds a number of options to Visual studio outside the TDS project. There is a Team Development for Sitecore solution right-click menu and a TDS Toolbar.
TDS Solution Right-Click menu
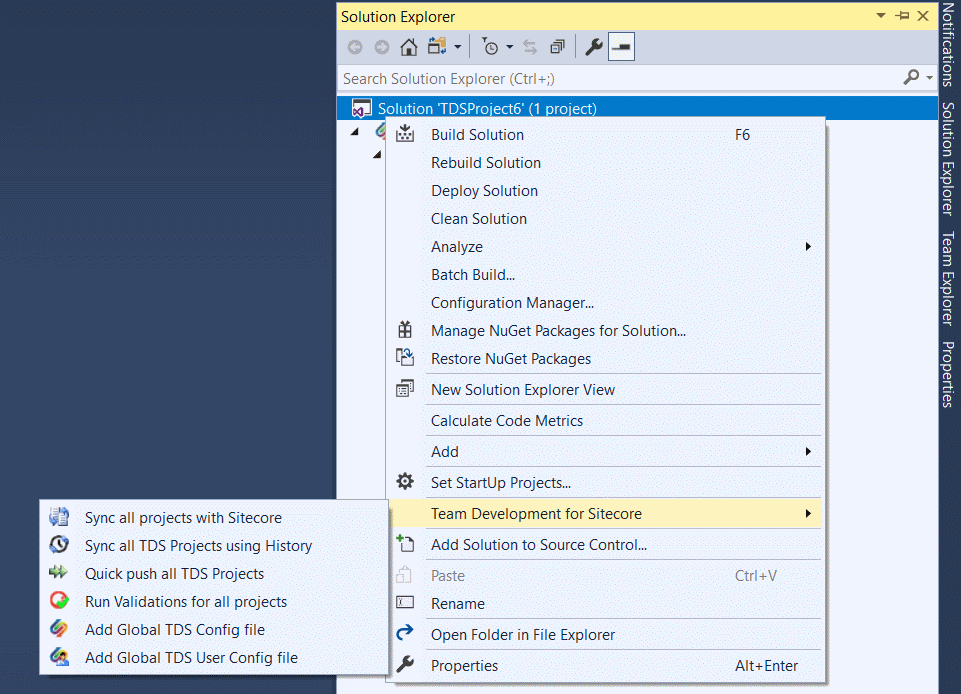
The Sitecore TDS solution right click menu allows the developer access to TDS features that effect all projects in the solution. To open the TDS Class Solution Right click menu, right click on the solution and click on Team Development for Sitecore on the solution menu. This will open a fly-out menu with the Sitecore TDS solution level functions:
TDS Toolbar
The Sitecore TDS toolbar allows the developer to quickly access the same functions as the TDS Solution right-click menu without opening the right-click menu. The toolbar is hidden by default, but can be opened by right-clicking on the toolbar area of Visual Studio and checking “TDS Toolbar”
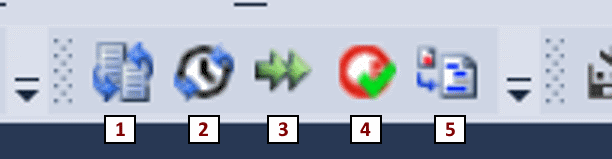
The functions of the buttons on the toolbar are as follows:
- Sync all projects with Sitecore
- Sync all TDS projects using History
- Quick Push all TDS projects
- Run Validators for all projects
- Run code generation for all projects
Sitecore Item Merge
The Sitecore Item Merge tool is a stand alone tool used to resolve merge conflicts in .item files during a source control merge/check-in. During installation, Sitecore TDS automatically configures the Item Merge Tool for TFS. Configuring the Sitecore Item Merge tool for other Source Control providers will be covered below.
When your source control detects a conflict, it will require user intervention to merge the files. Although, Sitecore item files are plain text files, they are not as simple as text files. Care needs to be taken to properly manage field ID’s, versions and languages during the merge. This requires a specialized tool to do the process quickly and efficiently.
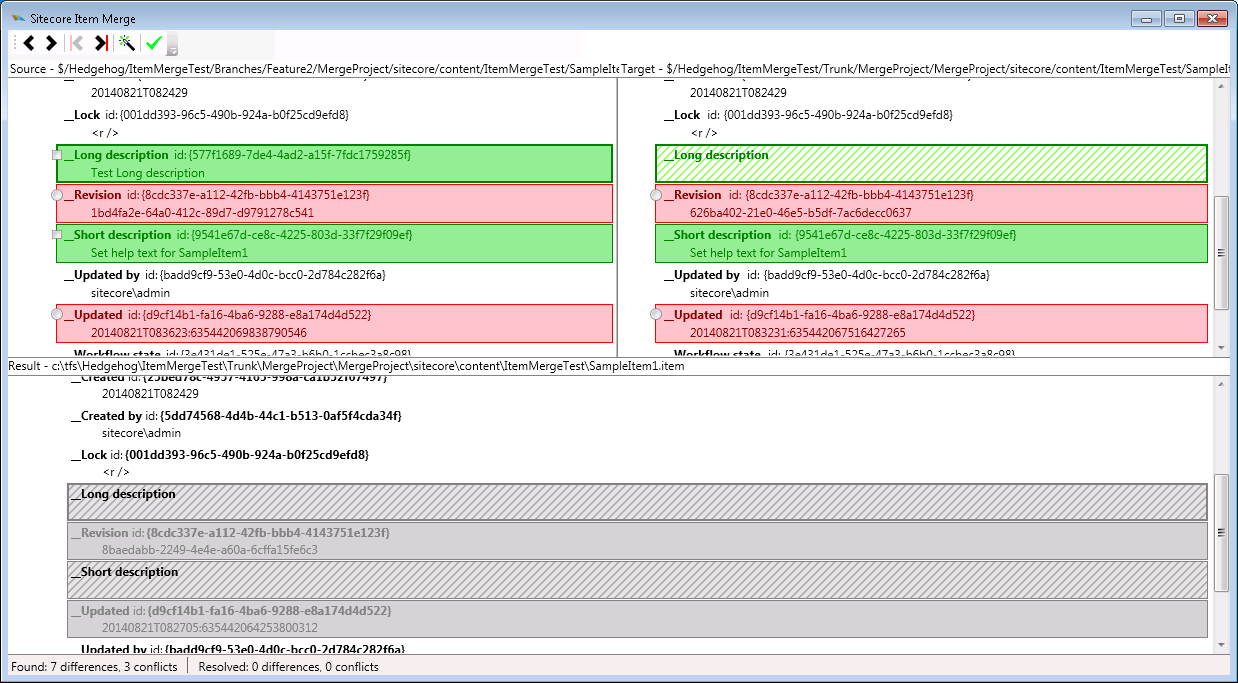
This screen shot shows a number of possible merge scenarios that may occur:
- The __Lock field is the same in the Source, Target and Result, and therefore has no special highlighting in any of the windows.
- The __Long description field was added in the source branch. Since this change is not a conflict between the two branches, it is highlighted in green. It is present on the left indicated by a solid highlight. It is not present on the right indicated by hashes. The gray hashes on the bottom indicate that there is a difference between the original and a branch. The item was not present in the original file.
- The __Revision field was changed in both branches, and is different in both branches. This is indicated by a red box around each item in the branches. This indicates a conflict between the two branches, and extra care should be taken when deciding how to proceed with the merge.
- The __Short description field has a green highlight, indicating the field values are not in conflict. The same value was added in both branches.
When resolving a merge, the user can choose to accept a change, reject a change or choose the value from one side or the other by checking the check boxes and/or radio buttons in the top portion of the merge tool. You can see the result of your choices in the lower portion.
The merge tool offers a few shortcut functions from a tool bar. The tool bar buttons perform the following tasks:
| Move to the previous difference | |
| Move to the next difference | |
| Move to the previous conflict | |
| Move to the next conflict | |
 |
Select all non-conflict changes |
 |
Accept all changes |
Setting up Sitecore Item Merge for Source Control Providers
Sitecore TDS automatically configures the Sitecore Item Merge to run for .item files inside of TFS. However, it needs to be configured for other source control providers.
The Sitecore Item Merge tool can be run from the command prompt. It accepts seven parameters from source control, which represent the four files that are part of the three-way merge, and optionally, the labels for each of the three sections of the window. The arguments for the Sitecore Item Merge are shown below in the order they are expected.
- [baseFilePath] – The file the merged files both started from.
- [branch1FilePath] – The file from the first branch.
- [branch2FilePath] – The file from the second branch.
- [finalFilePath] – The path to the file that holds the result of the merge.
- [branch1FileLabel] – Optional Label for the Branch1 file pane (the left window pane within the tool). This can be defined by source control or hard coded.
- [branch2FileLabel] – Optional Label for the Branch2 file pane (the right window pane within the tool). This can be defined by source control or hard coded.
- [finalFileLabel] – Optional Label for the Final file (the bottom window pane within the tool). This can be defined by source control or hard coded.
Configuring Sitecore Item Merge for Git using script
By default, Git only allows a single file merge tool. Fortunately, Git allows the developer to easily extend the merge functionality and allow us to use different merge tools for different file types. Please see the article: merge-wrapper (https://gist.github.com/elsevers/11349227) for more information on extending Git to use multiple merge tools.
The following code block is sample code modified from the above to provide Sitecore item merge capabilities in Git. Copy this script into a text editor, and save it without any file extension to your $HOME directory as ‘merge-wrapper-script’ (i.e C:\Users\myUserName\merge-wrapper-script).
#!/bin/bash
# Wrapper script for git mergetool
# This requires the .gitconfig file to have:
#  - mergetool entry for "TDSMerge";
#  - mergetool entry for "kdiff3";
# These merge tool entries must both specify the
# cmd field. The command to call this script:
# [mergetool "merge_wrapper"]
#	cmd = $HOME/merge-wrapper \"$BASE\" \"$LOCAL\" \"$REMOTE\" \"$MERGED\"
# Locate this script in your $HOME

BASE=$1
LOCAL=$2
REMOTE=$3
MERGED=$4

SCITEM="\.item"

if echo "$BASE" | grep -q "$SCITEM"; then
	echo "Using merge tool for sitecore item file";
	CMD=$(git config mergetool.TDSMerge.cmd)
	eval $CMD
else
#checking for additional special merge tool cases
#Finally, the default case:
	echo "Using default merge tool";
	CMD=$(git config mergetool.kdiff3.cmd)
	eval $CMD
fi

[mergetool "kdiff3"]
        cmd = \"C:/Program Files (x86)/KDiff3/kdiff3.exe\" \"$BASE\" \"$LOCAL\" \"$REMOTE\" -o \"$MERGED\"
The above code will detect the extension of the file being merged. For .item files it will run a mergetool entry called ‘TDSMerge’ from the .gitconfig file.
For all other files, it will run a mergetool entry called ‘kdiff3’ from the .gitconfig file. You can change ‘kdiff3’ to any other mergetool entry of your choice that you have installed, for example ‘winmerge’ or ‘TortoiseMerge’.
Note: .gitconfig files may exist in different locations for a developer’s machine. Typically, a global .gitconfig file (used for all of your git repositories) can be found at $HOME\.gitconfig (i.e C:\Users\myUserName\.gitconfig).
Now three modifications will be needed for the .gitconfig file:
First, change which mergetool entry Git will use for merges to ‘merge_wrapper’.
[merge]
#	tool = kdiff3    Commented out because we're switching over from kdiff to our merge wrapper script
	tool = merge_wrapper
Now create the ‘merge_wrapper’ entry which will call the merge-wrapper-script.
[mergetool "merge_wrapper"]
	cmd = $HOME/merge-wrapper-script \"$BASE\" \"$LOCAL\" \"$REMOTE\" \"$MERGED\"
Finally, create a TDSMerge entry, which is the entry that will be called by the script for any .item file merges.
[mergetool "TDSMerge"]
    cmd = \"C:/Program Files (x86)/Hedgehog Development/Team Development for Sitecore (VS2013)/SitecoreItemMerge.exe\" \"$BASE\" \"$LOCAL\" \"$REMOTE\" \"$MERGED\"
Note: Update the path of the SitecoreItemMerge.exe to the installation folder of Sitecore TDS for whichever Visual Studio version it is installed for. In this case, we’re pointing to the Sitecore TDS installation folder for Visual Studio 2013.
Configuring Sitecore Item Merge for Git using MergeChooser
Some Git tools don’t allow you to configure multiple merge tools based on the file extension. If you are using a tool like this, we have provided a simple merge tool wrapper application that can be configured to allow you to use multiple merge tools. This will effectively produce the same result as the merge-wrapper script above.
To setup the merge tool chooser, you will need to change your .gitconfig to point to a new ‘merge_chooser’ mergetool entry.
[merge]
#	tool = kdiff3
	tool = merge_chooser
Also add the ‘merge_chooser’ entry as follows
[mergetool "merge_chooser"]
	cmd = \"C:/Program Files (x86)/Hedgehog Development/Team Development for Sitecore (VS2013)/MergeToolChooser.exe\" \"$BASE\" \"$LOCAL\" \"$REMOTE\" \"$MERGED\"
Note: Update the path of the MergeToolChooser.exe to the installation folder of Sitecore TDS for whichever Visual Studio version it is installed for. In this case, we’re pointing to the Sitecore TDS installation folder for Visual Studio 2013.
The MergeToolChooser.exe application reads it’s configuration from the MergeToolChooserConfig.xml file located in the same directory. By default it specifies that SitecoreItemMerge.exe is the merge file for .item files and KDiff3 is the default merge tool for everything else.
<?xml version="1.0" encoding="utf-8" ?>
<MergeToolChooserConfig>
<!-- TDS Item Merge Tool -->
<MergeTool Extension=".item" Cmd=".\SitecoreItemMerge.exe" Parameters=""$1" "$2" "$3" "$4""/>
<!-- Default entry -->
<MergeTool Cmd="C:\Program Files (x86)\KDiff3\kdiff3.exe" Parameters=""$1" "$2" "$3" -o "$4""/>
</MergeToolChooserConfig>
This file can be altered to allow any merge tool(s) the developer wants to use. The parameters are specified in the Parameter attribute by using $1, $2, $3, etc. Where $1 represents the first parameter passed to the merge tool, $2 represents the second, and so on. The Extension attribute specifies the file extension to use for the specified merge tool. The Cmd attribute specifies the full path to the merge tool.
The merge tool is matched using the order that <MergeTool> elements are specified in the file and is based on the string specified in the Extension attribute. If no Extension attribute is specified, the merge tool is considered the default merge tool, therefore ensure it is the final entry in the list.
Global Config
A global configuration file can be added to a solution to control project properties across multiple Sitecore TDS projects.
To add a Global config right click on the solution in the Solution Explorer and click Add Global Sitecore TDS Config File:
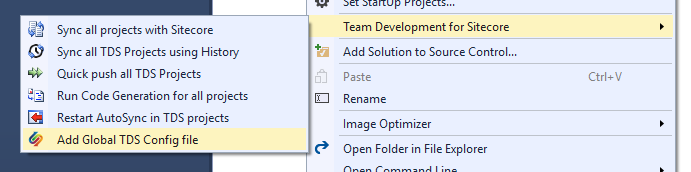
This will add the Solution Folder .tds containing the file TdsGlobal.config. Opening the file will show a set of commented out settings that can be controlled at a global level. Uncommenting a property allows the developer to set a value that will be used by all the Sitecore TDS projects, for example setting a PackageAuthor for all packages generated by all Sitecore TDS projects in the solution:
	<!-- Packaging properties -->
	<PackageAuthor>TDS Developer</PackageAuthor>
	<!--
	<PackagePublisher></PackagePublisher>
	<PackageVersion></PackageVersion>
	<PackageReadme></PackageReadme>
	<SitecoreAssemblyPath></SitecoreAssemblyPath>
	<GeneratePackage></GeneratePackage>
	<SeperateFilesAndItems></SeperateFilesAndItems>
	<AddDateTimeToPackageName></AddDateTimeToPackageName>
	-->
When a change is made to the TdsGlobal.config Visual Studio will prompt to reload all the TDS Projects, click Yes otherwise you may need to manually reload projects to see global configuration changes.
Opening the properties page for a project will now show that the Package Author value is being pulled from the global config:
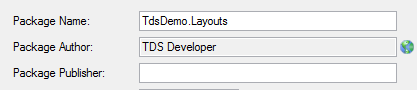
Values pulled from the global config can not be altered on the project page and therefore the control is disabled. The property will also display a globe to the right of the property to indicate it is a global value.
In TdsGlobal.config and TdsGlobal.config.user, please note that for the unconditional PropertyGroup section, only the Global Properties specified under the section can be used, which are SerializationFormat and CompactSitecoreItemsInProjectFile. Non-global properties should not be added in this section.
No custom properties should be added in TdsGlobal.config and TdsGlobal.config.user under any PropertyGroup section
Sitecore Rocks
Sitecore Rocks is a Visual Studio add-in that offers many great features designed to improve developer productivity when working with Sitecore. The features of Rocks that concern Sitecore TDS are the features that allow developers to perform some of the functions found in the Sitecore desktop without leaving the Visual Studio. Sitecore TDS takes advantage of the Sitecore Rocks plug-in framework to create a connectivity layer between Sitecore TDS and Rocks.
When a developer adds, updates or removes an item or template in Rocks, Sitecore TDS is notified and automatically pulls those changes into the Sitecore TDS project. In addition, when Rocks is connected to Sitecore TDS, double clicking on a Sitecore item in the Solution Explorer will open the item in the Rocks item/template editor.
Setting up Rocks and Sitecore TDS
There are two things needed to make Sitecore TDS react to changes made in Rocks.
- The Hedgehog Development plug-in must be enabled in the Rocks plug-in screen.
- The Sitecore Web URL (see Build Property Page above) for the active project configuration matches the Host Name in the Rocks connection dialog.
Getting items using Rocks
You can include Sitecore items directly from Rocks, right clicking on an item in Rocks you will be able to access the Sitecore TDS menu that allows you to add items to a TDS project:

This will bring up the Get Sitecore Items dialog at the node you have selected. Once an item has been added to a Sitecore TDS project you can Sync the item and its children from the Rocks menu:

Sitecore TDS and Sitecore upgrades
The difficulty of a Sitecore upgrade can vary depending on how much has changed between the current and target version of Sitecore. Sitecore TDS can help during the upgrade process, but should not be used to perform the actual upgrade. Sitecore invests a significant amount of resources testing their upgrade procedures, and Sitecore TDS is not part of that testing. Sitecore TDS helps during the upgrade process by allowing the development team to compare the upgraded Sitecore instance with the latest version of the project using the Sync Window. This can help pinpoint places where the changes made by the Sitecore upgrade may affect the Sitecore implementation. Each Sitecore upgrade is different. We start with the typical scenario shown below and make changes to the plan where needed based on our findings during the upgrade.
- Make sure all environments that will be upgraded have a recent copy of the production site.
- Make sure the current version of the Sitecore TDS project matches the production site.
- Upgrade a developer machine.
- Compare the project to Sitecore using the Sync Window.
- If there are any changes, evaluate how they affect the implementation and commit the upgrade changes and any fixes to the implementation to source control.
- Update any references to the Sitecore assemblies.
- Update configuration files in the other projects as needed by the upgrade process.
- Commit changed project files to source control.
- Upgrade other developer instances (if needed).
- Upgrade the QA environments.
- Deploy the upgraded Sitecore TDS project to the upgraded environments.
- Upgrade production.
- Deploy the upgraded Sitecore TDS project to the upgraded production environment.
The steps above are a good starting point, but are not a complete upgrade plan. There are a number of places where backups and testing would be done, but these steps have been omitted for simplicity.
Upgrading to YAML
Sitecore 9.2 allows developers to choose the format Sitecore will use when serializing items into the TDS project. The two formats supported by Sitecore are Item serialization and Yaml. TDS projects support quick and easy conversion from Item format to Yaml to make moving to the more modern serialization format quick and easy.
Upgrading your Sitecore items to Yaml is very easy. The first step is to open the general property tab for the project and change the Serialization Format to YML Serialization. You will be prompted to continue:
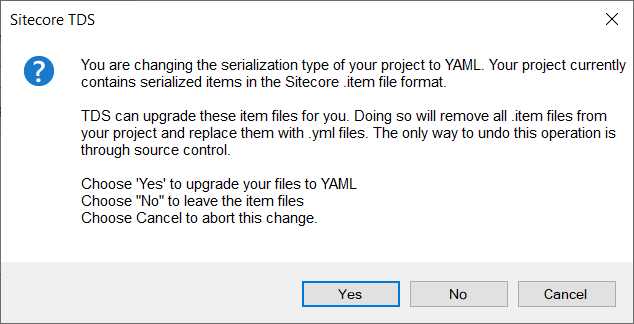
Choosing “Yes” will open a dialog with a listing of all .item files in the project.
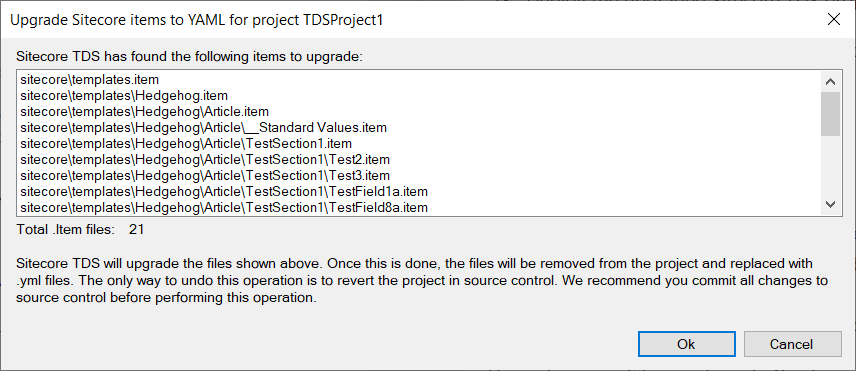
Clickig Ok will perform the upgrade. When the upgrade is complete, all .item files in the project will be removed and replaced with .yml files with the same name. All settings in the TDS project will be preserved, making the upgrade nearly effortless.